Log in
Search
Latest topics
» Happy Anzac Day!by Admin Today at 5:50 pm
» Fox .35 Modifications
by Onelife Today at 4:34 pm
» Project Cox .049 r/c & Citabrian Champion
by MauricioB Today at 4:08 pm
» Jim Walkers FireBee - This is going to be fun
by rsv1cox Today at 3:56 pm
» Revivng Some Childhood Classics
by rsv1cox Today at 7:17 am
» Introducing our Cox .049 TD Engines
by getback Today at 6:20 am
» Roddie's flat-bottomed boat..
by Levent Suberk Today at 12:23 am
» Cox powered jet-pump for model Sprint Boat
by roddie Yesterday at 10:25 pm
» Micro Draco Gets to Fly on a Beautiful Morning.
by rdw777 Yesterday at 8:15 pm
» Jim Walker Firebaby
by rdw777 Yesterday at 8:06 pm
» Hydro-bat by Vic Smeed: engine probs
by GallopingGhostler Yesterday at 5:12 pm
» Roddie-Rigger.. a 2005 original design
by roddie Yesterday at 3:39 pm
Cox Engine of The Month
Summer restoration project
Page 1 of 1
 Summer restoration project
I got this by mail last weekend:
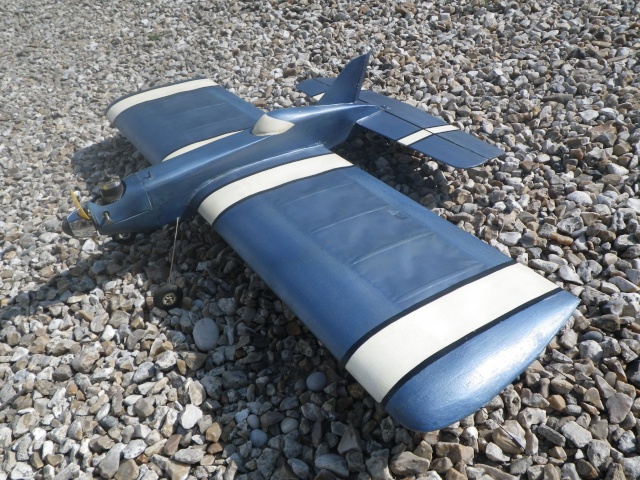
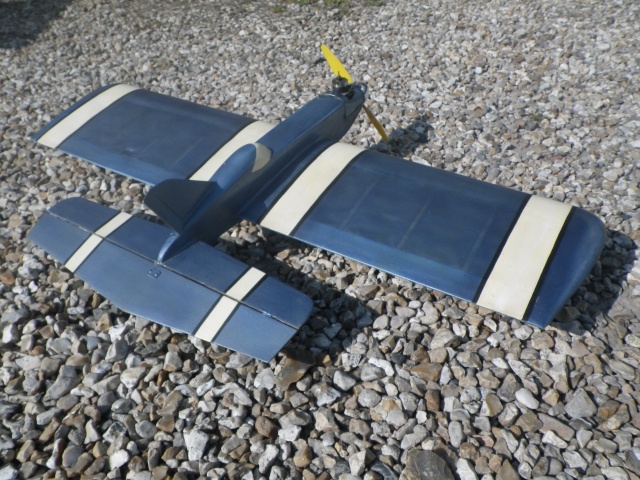
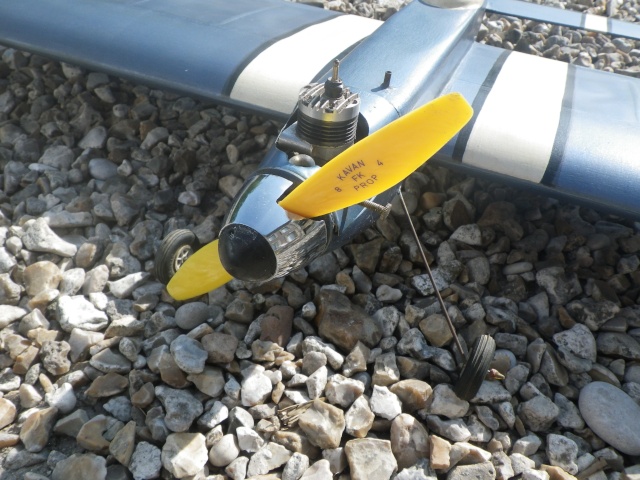
Easy question: what is it?
The controls work but are very stiff. When I move the lead out wires, I hear a noise coming from the bellcrank area that sounds like rubbing a block of wood over very course sanding paper. It seems that the push rod is not a straight rod but is curved, presumably sliding into a tube. Maybe there is some corrosion somewhere? Any suggestions to free the controls?
Lieven

OVERLORD- Diamond Member

- Posts : 1786
Join date : 2013-03-19
Age : 57
Location : Normandy, France
 Re: Summer restoration project
Never seen one like that, but it looks very aerobatic, nice fat wing and a stubby fuselage. It ought to turn some tight corners. Looks like a seriously fun plane. What sort of engine is it? An 8x6 prop says maybe a .10ci or more.
Dang, come to think of it, I love it. Now I want one. What's the wingspan?
Dang, come to think of it, I love it. Now I want one. What's the wingspan?
_________________
Don't Panic!
...and never Ever think about how good you are at something...
while you're doing it!
My Hot Rock & Blues Playlist
...and never Ever think about how good you are at something...
while you're doing it!
My Hot Rock & Blues Playlist

RknRusty- Rest In Peace

- Posts : 10869
Join date : 2011-08-10
Age : 68
Location : South Carolina, USA
 Re: Summer restoration project
That fuselage is a thing of beauty,
and the blue color reminds me of
an old Testors metalic paint.
Sweet!
Bob
and the blue color reminds me of
an old Testors metalic paint.
Sweet!
Bob

dckrsn- Diamond Member

- Posts : 2750
Join date : 2010-10-21
Age : 71
Location : Long Island, New York

jjscott- Bronze Member

- Posts : 34
Join date : 2013-01-12
Location : Wisconsin
 Re: Summer restoration project
Sweet!
Oil the lead outs. The bell crank and rod probably run inside the fuse for most of their travel, and would be inaccessible without opening the body.
Phil
Oil the lead outs. The bell crank and rod probably run inside the fuse for most of their travel, and would be inaccessible without opening the body.
Phil

pkrankow- Top Poster

- Posts : 3025
Join date : 2012-10-02
Location : Ohio
 Re: Summer restoration project
Cool plane. Sort of looks like a Sterling Super Ringmaster.

sdjjadk- Platinum Member

- Posts : 640
Join date : 2012-04-07
Location : Southern Maryland
 Re: Summer restoration project
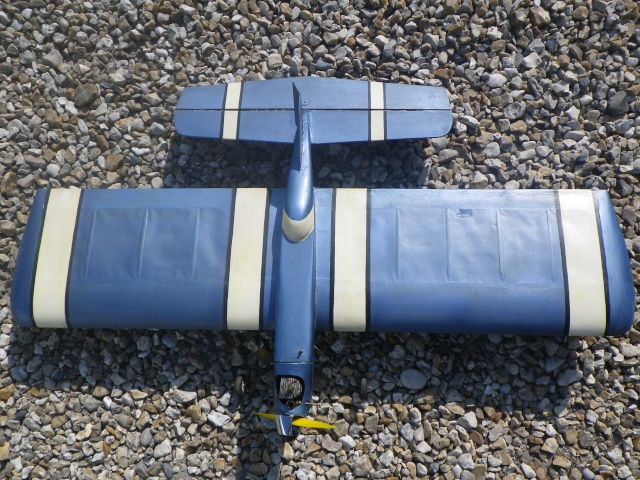
It is indeed a BLUE PANTS, designed by my compatriot, the Belgian Henry Stouffs in the early 50's. Stouffs became world champion stunt at the championships in the Hague, Holland in 1954 with this model. An article appeared in Aeromodeller in Jan 1955 I think. Stouffs had a model shop in Brussels for a while. He was also known as a glider pilot. He died in 1990.

It has a OS MAX III .15. Wings and stab are assymetrical. It's got rudder and engine offset. Winspan is almost a metre. It was even kitted by the Belgian kit builder Svenson. I think my plane is such a kit.
lieven

It has a OS MAX III .15. Wings and stab are assymetrical. It's got rudder and engine offset. Winspan is almost a metre. It was even kitted by the Belgian kit builder Svenson. I think my plane is such a kit.

lieven

OVERLORD- Diamond Member

- Posts : 1786
Join date : 2013-03-19
Age : 57
Location : Normandy, France
 Re: Summer restoration project
Hi Lieven, you are a lucky man !!!!
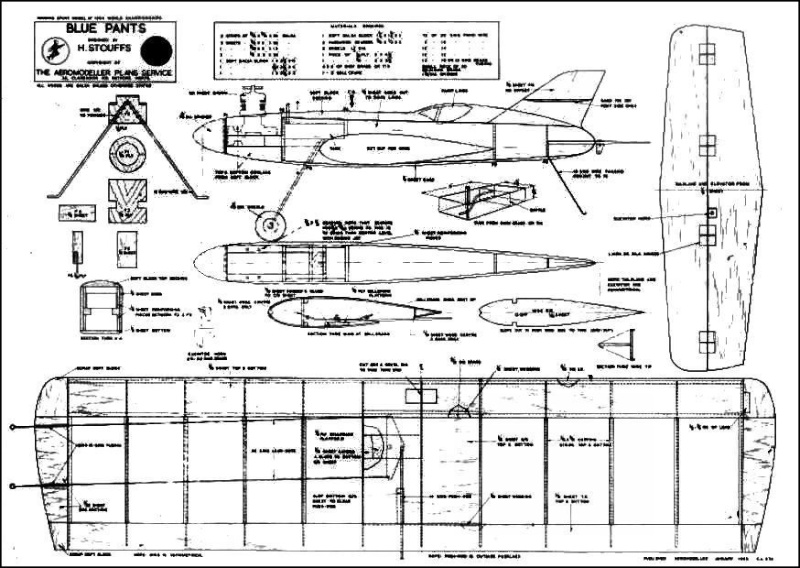
I have the original plan from the Svenson kit. It's not really different than the outerzone copy. Just in French.
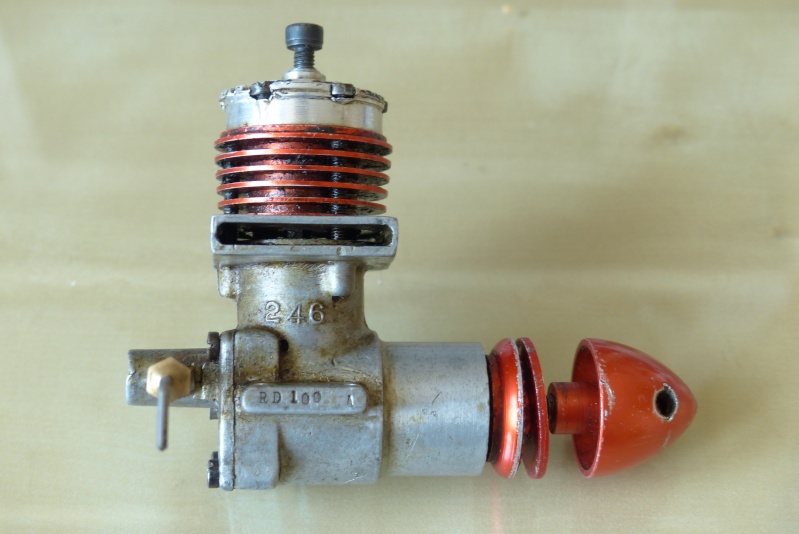
I found a difference between the engines, the Svenson copy shows a glow plug engine like your OS MAX III (one a the best OS 15), the outerzone copy shows an ED Racer. Like this one :
If you want a copy of the plan, I can do it (but for some days I will be far from home...)
Rémy
I have the original plan from the Svenson kit. It's not really different than the outerzone copy. Just in French.
I found a difference between the engines, the Svenson copy shows a glow plug engine like your OS MAX III (one a the best OS 15), the outerzone copy shows an ED Racer. Like this one :

If you want a copy of the plan, I can do it (but for some days I will be far from home...)
Rémy

navion34- Gold Member

- Posts : 208
Join date : 2012-09-09
Age : 60
Location : France
 Re: Summer restoration project
Salut Rémy,
The ED Racer is the engine that Stouffs had in his plane. I'm interested in the Svenson plan. We'll speak when you're back. thanks.
By the way, below, a picture of the Senson kit box:

or look on this web site with more original model boxes:
http://www.avonds.com/Kit%20Collection.htm
Lieven
The ED Racer is the engine that Stouffs had in his plane. I'm interested in the Svenson plan. We'll speak when you're back. thanks.
By the way, below, a picture of the Senson kit box:

or look on this web site with more original model boxes:
http://www.avonds.com/Kit%20Collection.htm
Lieven

OVERLORD- Diamond Member

- Posts : 1786
Join date : 2013-03-19
Age : 57
Location : Normandy, France
 Re: Summer restoration project
Hi Lieven, I will be out from July 26 th to August 4 th, so if I can I will copy the plan this week, let me know your snail address by PM.
The Svenson kits were really greats, I had five Pinto (one is always alive), two Twinny (one is still alive), one Cub (my first RC plane) and I plan to built a Wayfarer (with a 4 stroke as OS 70 FS as power unit from the plan). Another good plane is the Fly Boy. Thank for this link, good souvenirs for me.
Don't forget, your OS 15 is plain bearing so run with a lot of castor oil (25% is a good ratio).
Rémy

navion34- Gold Member

- Posts : 208
Join date : 2012-09-09
Age : 60
Location : France
 Re: Summer restoration project
It is, without a doubt, "Bluepants". I built one from the Aeromodeller Plans Service while still at school! A long, long time ago.
Mine flew exceptionally well with a PAW 19 diesel.
Mine flew exceptionally well with a PAW 19 diesel.

ian1954- Diamond Member

- Posts : 2688
Join date : 2011-11-16
Age : 69
Location : England
 Re: Summer restoration project
It's quite neat looking. I bet with that short tail it's a real handful. If you fly it some video would be great!

Cribbs74- Moderator


Posts : 11895
Join date : 2011-10-24
Age : 50
Location : Tuttle, OK
 Re: Summer restoration project
Well Lieven - this has brought back memories! (from 40+ years ago .........)
I was thinking about the BluePants while I was driving to and from the North of England. I know - 80 mph I should concentrate on the road but driving cars is boring!
I won the school "craft" competition with it. Not finished, not covered and no engine mounted - just bare balsa!
I first ran it with an Enya 15 and although it flew - any attempt at stunts had me running backwards keeping the lines taught. I also made a big mistake with the undercarriage. I didn't have any piano wire so I used a wire coathanger. BIG MISTAKE. It bent on every landing and eventually snapped when being straightened.
I reworked it for a PAW 15, new piano wire undercarriage and covered it with nylon. I had used heavyweight tissue before. This time it didn't need as much weight at the front to balance it and although the plane came out slighly heavier - the flights were amazing. It was very responsive and "combat like" in the air.
The PAW 15 was replaced with the Club's PAW 19 - straight swap and all additional weight removed. It became more responsive, very fast and was occasionally used for combat.
It then became one of the Club's trainers!
I moved on to Dominators with Oliver Tigers. (Always rubbish at combat (never won and never placed!) but what fun!). In real competitions I was the builder and pit man.
I wish you well with this and I am restraining my pangs of jealousy!

ian1954- Diamond Member

- Posts : 2688
Join date : 2011-11-16
Age : 69
Location : England
 Re: Summer restoration project
Back to the original issue: It looks like the pushrod is totally enclosed in the fuse. If the pushrod runs through a tube, you might try a bit of light oil down it.
Are the leadouts wire or cable? If wire, I'd push/pull both at once to make sure the bellcrank pivot is still secure. If the bell crank was pulling out, it would account for the noise, the drag in the mechanism and any apparent curvature in the pushrod.
It would be a shame to tear into that beautiful vintage finish just to have a look... Good luck!

ahrma_581- Gold Member

- Posts : 290
Join date : 2012-03-21
Location : Sonoran desert
 Re: Summer restoration project
Thanks for the tips guys.
Lead outs are wire and not cables. I will try to run some oil along the pushrod from the control horn down.
Lieven
Lead outs are wire and not cables. I will try to run some oil along the pushrod from the control horn down.
Lieven

OVERLORD- Diamond Member

- Posts : 1786
Join date : 2013-03-19
Age : 57
Location : Normandy, France
 Re: Summer restoration project
I found the problem with the controls: the leadout wires were bent in way of the wing tip block. I straightened them as good as I could. It's all much lighter now although the elevator still doesn't drop down from its own weight. With some pull on the lines during flying, this all should go easier.
I removed the glow plug and put it under tension. Only smoke was coming off due to WD 40 remnants. After a close look, I could see that the resistance was touching the plug housing. After a fiddle with a toothpick, it gave a nice orange glow.
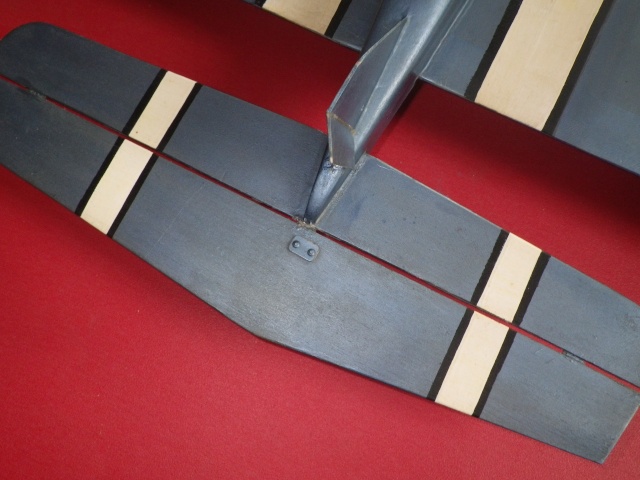
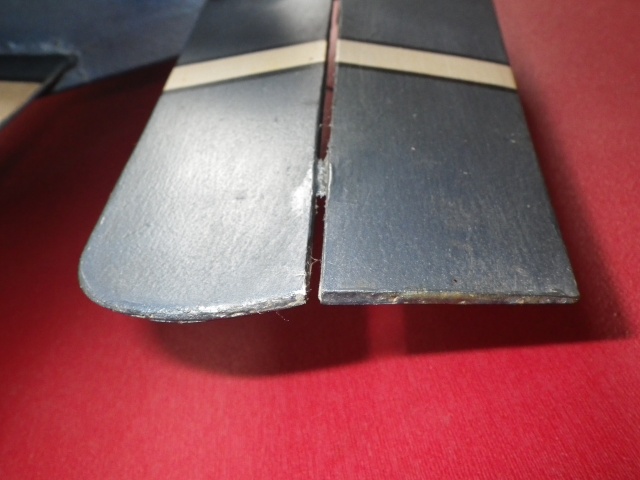
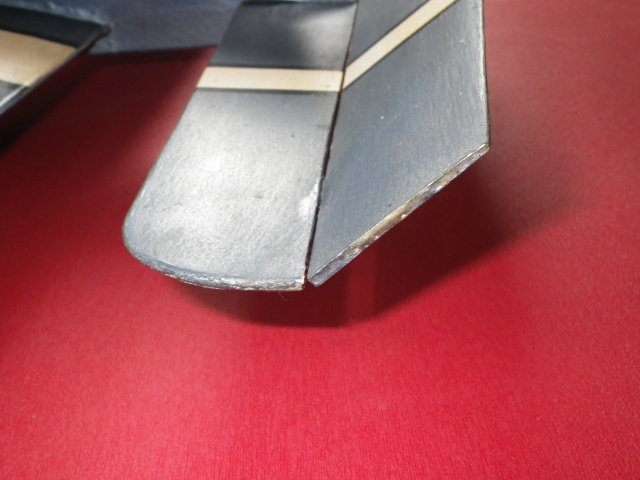
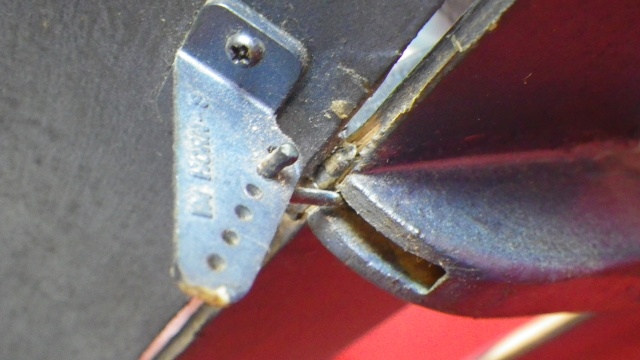
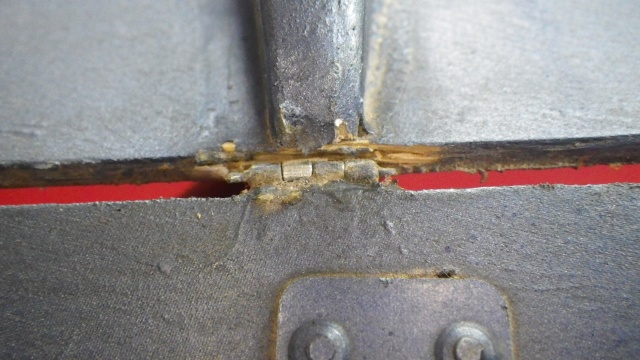
The elevator is attached with 3 hinges. The central hinge sits loose in the stab/ fuse tail. Apparently, the bellcrank doesn't have a stop for "up". When giving full up, which is 45° , the hinge is pulled out of the stab. I'm thinking of glueing the hinge with some epoxy. What would be the best way to limit the elevator movement? Add a piece of wood into the slot of the push rod?
It's raining cats 'n dogs over here, all day long. Normandy seems to be worse than Manchester.
Lieven
I removed the glow plug and put it under tension. Only smoke was coming off due to WD 40 remnants. After a close look, I could see that the resistance was touching the plug housing. After a fiddle with a toothpick, it gave a nice orange glow.
The elevator is attached with 3 hinges. The central hinge sits loose in the stab/ fuse tail. Apparently, the bellcrank doesn't have a stop for "up". When giving full up, which is 45° , the hinge is pulled out of the stab. I'm thinking of glueing the hinge with some epoxy. What would be the best way to limit the elevator movement? Add a piece of wood into the slot of the push rod?


It's raining cats 'n dogs over here, all day long. Normandy seems to be worse than Manchester.
Lieven

OVERLORD- Diamond Member

- Posts : 1786
Join date : 2013-03-19
Age : 57
Location : Normandy, France
 BLUE PANTS restoration project
I removed the "bonnet". It's made of a shaped brass sheet and is reinforced with piano wire that ends in pins on the 4 corners. Engine bearers and bolts seem to be OK. After removing the needle valve, I noticed that the tip is probably broken off. I had a look in the spraybar with a flash light but no obstruction was found in there. Is the NVA on this engine any differetnt than on other OS Max 15's?
Lieven
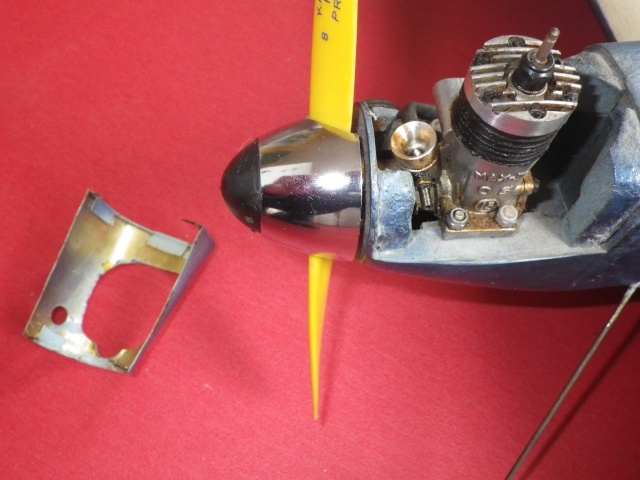
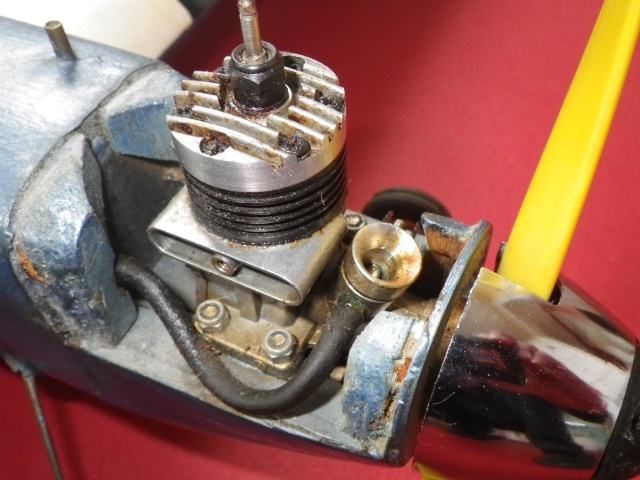

Lieven


OVERLORD- Diamond Member

- Posts : 1786
Join date : 2013-03-19
Age : 57
Location : Normandy, France
 Re: Summer restoration project
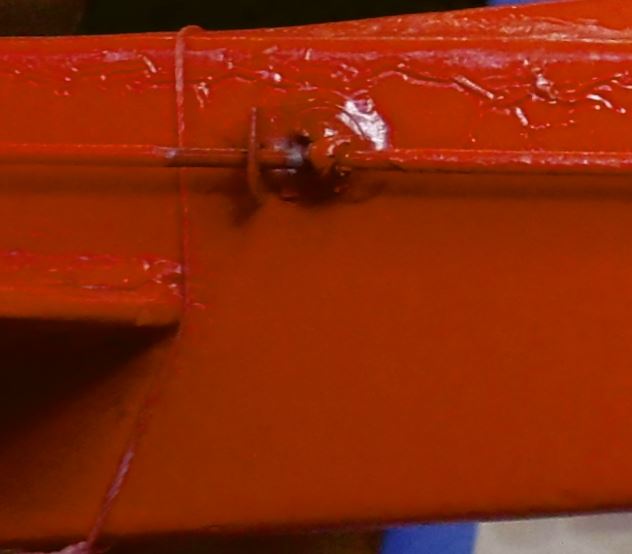
If the plane has a guide that the control rod slides through to keep it from bowing, I would wrap some copper wire around the rod on each side of the guide and solder it. Then the guide can be the stop for the control throw.OVERLORD wrote:What would be the best way to limit the elevator movement?
It's hard to see because it's all slathered in red but here's how I limited the down throw. You could do it on either or both sides.
_________________
Don't Panic!
...and never Ever think about how good you are at something...
while you're doing it!
My Hot Rock & Blues Playlist
...and never Ever think about how good you are at something...
while you're doing it!
My Hot Rock & Blues Playlist

RknRusty- Rest In Peace

- Posts : 10869
Join date : 2011-08-10
Age : 68
Location : South Carolina, USA
 Re: Summer restoration project
Best way to limit elevator movement is move the control rod to the outermost hole on the horn.
Jim
Jim

JPvelo- Diamond Member

- Posts : 1972
Join date : 2011-12-02
Age : 56
Location : Colorado
 Re: Summer restoration project
Rusty, the pushrod is totally hidden into the fuse. I see only the end sticking out as on the picture above. Moving the pushrod to another hole is maybe the most logic thing to do in such a case as Jim said. However, when I tried the controls this morning after I reglued the central hinge, the problem seems to have solved itself. The elevator travel is limited and is at the same angle up and down.
I'm going to fill up the tank now with pure methanol and let it soak to take the dirt out.
Lieven
I'm going to fill up the tank now with pure methanol and let it soak to take the dirt out.
Lieven

OVERLORD- Diamond Member

- Posts : 1786
Join date : 2013-03-19
Age : 57
Location : Normandy, France
 Re: Summer restoration project
Good, Lieven. If there's still a wide gap at the hinge line, you might benefit from sealing it underneath with some hinge tape or even clear packing tape. That might help it handle a little better. That's a good looking engine. I think this plane is a real jewel.
_________________
Don't Panic!
...and never Ever think about how good you are at something...
while you're doing it!
My Hot Rock & Blues Playlist
...and never Ever think about how good you are at something...
while you're doing it!
My Hot Rock & Blues Playlist

RknRusty- Rest In Peace

- Posts : 10869
Join date : 2011-08-10
Age : 68
Location : South Carolina, USA
 Re: Summer restoration project
I like it too. I wasn't looking for it but it was proposed to me during another sale. When I found out what it was, I couldn't resist. It was sent by post and I tried to figure out in how many bits I would find it after unpacking. Luckily, it arrived in one piece.
Planes look nice with the cockpit far back. Racers and speed record planes in the late 20's and 30's were made like that. If you like these kind of airplanes with that distinctive look, I can recommend this book:

The Speed Seekers by Thomas G. Foxworth. This book deals with Schneider trophy races, Pullitzer air races and others from the 20's. It has a lot of pictures of American, British, French and Italian racers. Some of them are real freaks!!
There's indeed a wide gap at the hinges of about 3mm. I hope the engine will be OK. Maybe I'll try to run it with the present needle valve. wait and see.
Lieven
Planes look nice with the cockpit far back. Racers and speed record planes in the late 20's and 30's were made like that. If you like these kind of airplanes with that distinctive look, I can recommend this book:

The Speed Seekers by Thomas G. Foxworth. This book deals with Schneider trophy races, Pullitzer air races and others from the 20's. It has a lot of pictures of American, British, French and Italian racers. Some of them are real freaks!!
There's indeed a wide gap at the hinges of about 3mm. I hope the engine will be OK. Maybe I'll try to run it with the present needle valve. wait and see.
Lieven

OVERLORD- Diamond Member

- Posts : 1786
Join date : 2013-03-19
Age : 57
Location : Normandy, France
 Re: Summer restoration project
I emptied the tank after having it soaked with methanol for about 14 days. I drained the methanol out and 1 hour ago, I got the Workmate out to give the engine a spin.
After some cickbacks, I've got it running with the needle turned open 3 turns. I closed it then for 1/2 turn and the speed went slightly up as it leaned out. In the upright up position, the engine ran for a little more than a minute. Then it died. Shouldn't it run a bit longer? I know the suction pipe is at half height but still... While it was running, I saw plenty of air in the silicon tube.
A video is uploading now.
Lieven

OVERLORD- Diamond Member

- Posts : 1786
Join date : 2013-03-19
Age : 57
Location : Normandy, France

OVERLORD- Diamond Member

- Posts : 1786
Join date : 2013-03-19
Age : 57
Location : Normandy, France
 Similar topics
» Unsafe at Any Speed - A summer time project?
» A restoration project -- not COX related
» The coolest 6 minutes you'll watch today...
» Finky sayz Happy Longest Day!!!!!
» Hot Fun in the Summer Time !
» A restoration project -- not COX related
» The coolest 6 minutes you'll watch today...
» Finky sayz Happy Longest Day!!!!!
» Hot Fun in the Summer Time !
Page 1 of 1
Permissions in this forum:
You cannot reply to topics in this forum

 Rules
Rules