

 Rules
Rules
by Onelife Today at 6:47 pm
» Happy Anzac Day!
by 706jim Today at 6:44 pm
» Project Cox .049 r/c & Citabrian Champion
by MauricioB Today at 4:08 pm
» Jim Walkers FireBee - This is going to be fun
by rsv1cox Today at 3:56 pm
» Revivng Some Childhood Classics
by rsv1cox Today at 7:17 am
» Introducing our Cox .049 TD Engines
by getback Today at 6:20 am
» Roddie's flat-bottomed boat..
by Levent Suberk Today at 12:23 am
» Cox powered jet-pump for model Sprint Boat
by roddie Yesterday at 10:25 pm
» Micro Draco Gets to Fly on a Beautiful Morning.
by rdw777 Yesterday at 8:15 pm
» Jim Walker Firebaby
by rdw777 Yesterday at 8:06 pm
» Hydro-bat by Vic Smeed: engine probs
by GallopingGhostler Yesterday at 5:12 pm
» Roddie-Rigger.. a 2005 original design
by roddie Yesterday at 3:39 pm


Oriental ARF assembly
Page 2 of 5 •  1, 2, 3, 4, 5
 ![]()
 Re: Oriental ARF assembly
![]() getback Tue Jan 06, 2015 6:50 am
getback Tue Jan 06, 2015 6:50 am

getback- Top Poster


Posts : 10114
Join date : 2013-01-18
Age : 66
Location : julian , NC
Re: Oriental ARF assembly
![]() ian1954 Tue Jan 06, 2015 7:01 am
ian1954 Tue Jan 06, 2015 7:01 am
getback wrote:Rusty / Ian , Is that hinge sanding block made of ply ? I really like the way those hinges look and gap less . I have plenty of those hinges and would like to use them on my larger models . Thanks Eric
Made from scrap pieces of balsa. Cyano glued together.

ian1954- Diamond Member

- Posts : 2688
Join date : 2011-11-16
Age : 69
Location : England

getback- Top Poster
-
Posts : 10114
Join date : 2013-01-18
Age : 66
Location : julian , NC
Re: Oriental ARF assembly
![]() RknRusty Tue Jan 06, 2015 10:27 am
RknRusty Tue Jan 06, 2015 10:27 am
Use a piece of music wire that is exactly half as thick as the edge of the flap as a center guide. Lay it against the flap and draw a line along the full length of the flap. All hinge slots should be cut along this line.
Rusty
EDIT: I just fixed a confusing sentence in my earlier post. It now reads as follows:
"Leave the TE of the wing flat with only hinge slots and no recesses."
_________________
...and never Ever think about how good you are at something...
while you're doing it!
My Hot Rock & Blues Playlist

RknRusty- Rest In Peace

- Posts : 10869
Join date : 2011-08-10
Age : 68
Location : South Carolina, USA
Re: Oriental ARF assembly
![]() roddie Tue Jan 06, 2015 5:49 pm
roddie Tue Jan 06, 2015 5:49 pm
ian1954 wrote:getback wrote:Rusty / Ian , Is that hinge sanding block made of ply ? I really like the way those hinges look and gap less . I have plenty of those hinges and would like to use them on my larger models . Thanks Eric
Made from scrap pieces of balsa. Cyano glued together.
If you're scratch-building a wing with external spars, you could use a similar tool made to the width/depth of your spar to cut all the notches in a rib-stack too. Another use could be for cutting rib-stations into L/E and T/E stock. Make a T-block to fit in the first slot, to gage the location of the next slot to be cut.. then cut them all without having to mark/measure each one.

roddie- Top Poster
- Posts : 8268
Join date : 2013-07-17
Age : 64
Location : N. Smithfield, Rhode Island -

Re: Oriental ARF assembly
![]() RknRusty Tue Jan 06, 2015 9:07 pm
RknRusty Tue Jan 06, 2015 9:07 pm

A good rib slot cutter might be made from a cut down hacksaw or jigsaw blade with the right width kerf.
All I did today is mark the locations of where the wing needs to seat. I think some modeling clay might help me find the right size and dimensions of the center mounting sheet. I need to go over to SH and search out info on mounting wings in full fuse planes. This is my first.
Rusty
_________________
...and never Ever think about how good you are at something...
while you're doing it!
My Hot Rock & Blues Playlist
RknRusty- Rest In Peace
- Posts : 10869
Join date : 2011-08-10
Age : 68
Location : South Carolina, USA
Re: Oriental ARF assembly
![]() Ken Cook Wed Jan 07, 2015 4:21 am
Ken Cook Wed Jan 07, 2015 4:21 am

Ken Cook- Top Poster
- Posts : 5449
Join date : 2012-03-27
Location : pennsylvania
Re: Oriental ARF assembly
![]() RknRusty Wed Jan 07, 2015 10:27 am
RknRusty Wed Jan 07, 2015 10:27 am
Absolutely. I insert them into the flap slots with epoxy, then pull them back out an 8th of an inch or so, wipe any excess glue off with alcohol, and now comes the most important part of aligning them to equal depth.Ken Cook wrote: While it may be more time consuming, it should be mentioned that gluing one leaf into either or side at a time is highly recommended. Don't try and glue both the flap and also the trailing edge simultaneously. This will allow you even by eye to properly square the hinge leafs as they exit the pieces. It doesn't take much to bind a hinge if it's crooked. Using a small piece of 1/64" ply as a tool to properly spread the epoxy into the hinge pockets you can then use a heat gun to liquify the epoxy allowing it to go further into the pocket. Any excess on top will run into the pocket. Quickly insert the hinges and adjust accordingly. 30 min epoxy is far superior to 15 min. Give yourself enough working time. Ken
On my work table I have a thick glass plate with a perfectly straight edge. I hold the flap with all the hinge tabs pointed up and press the hinged edge of the flap against the straight edge, which presses them all in simultaneously to the same depth. You can use any straight edge. A clean door jamb for instance.
Then I place the flap on the edge of the table with the hinges hanging off until the glue hardens. After it's beginning to set firmly, I carefully work each hinge to check for stiffness. If you properly filled the hinge barrels with vaseline, they should be fine.
Rusty
_________________
...and never Ever think about how good you are at something...
while you're doing it!
My Hot Rock & Blues Playlist
RknRusty- Rest In Peace
- Posts : 10869
Join date : 2011-08-10
Age : 68
Location : South Carolina, USA
Re: Oriental ARF assembly
![]() RknRusty Mon Jan 12, 2015 11:11 pm
RknRusty Mon Jan 12, 2015 11:11 pm
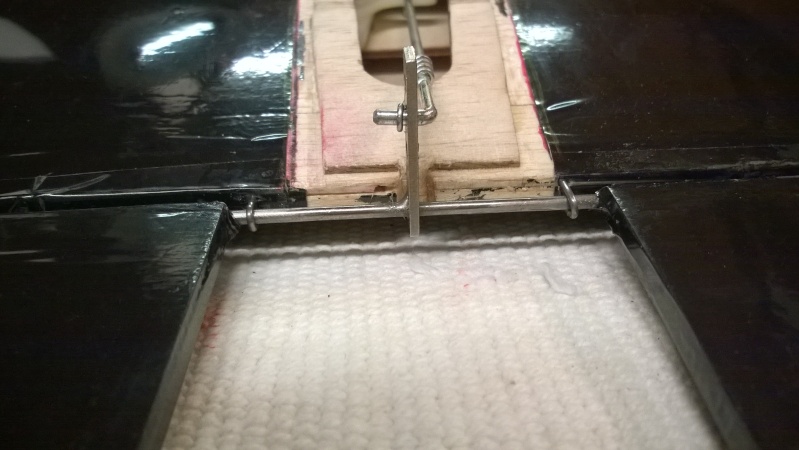
Meanwhile I took some of Ken's advice and made a pair of reinforcing loops of wire for the flap horn. This will help keep the stress on the first hinge on each side in case the horn's rotation is slightly elliptical.
here they are, epoxied into either side of the horn.
_________________
...and never Ever think about how good you are at something...
while you're doing it!
My Hot Rock & Blues Playlist
RknRusty- Rest In Peace
- Posts : 10869
Join date : 2011-08-10
Age : 68
Location : South Carolina, USA
Re: Oriental ARF assembly
![]() Ken Cook Mon Jan 12, 2015 11:45 pm
Ken Cook Mon Jan 12, 2015 11:45 pm
The next problem one is faced with the Oriental is the very low grade wire for the pushrod. My suggestion is not to use it period. You have no way to make a fair lead to support it inside the fuse. A carbon fiber or arrowshaft pushrod is the way to go. However, the holes in the stock flaphorn are metric which usually requires some form of eyelet or bushing in it to allow for the L bend in the fractional music wire. Ken
Ken Cook- Top Poster
- Posts : 5449
Join date : 2012-03-27
Location : pennsylvania
Re: Oriental ARF assembly
![]() RknRusty Thu Jan 15, 2015 1:48 pm
RknRusty Thu Jan 15, 2015 1:48 pm

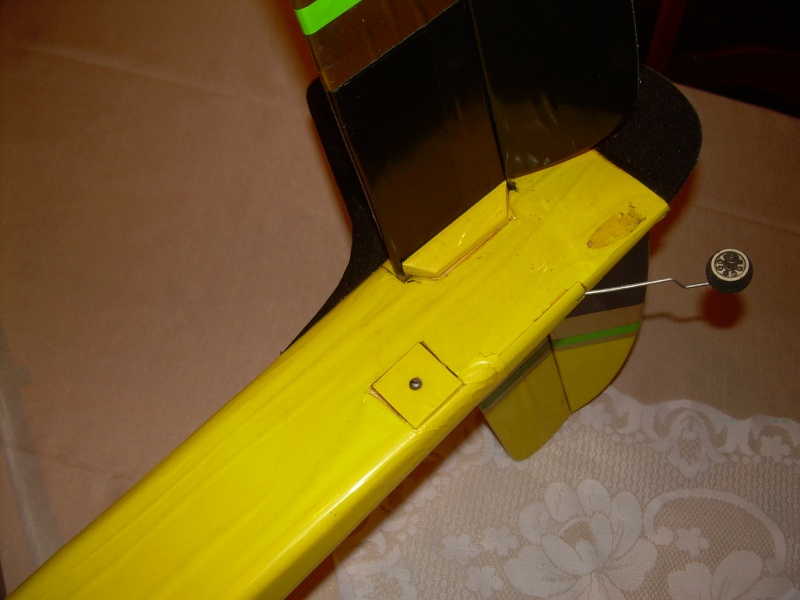
Then I hooked it to the flap horn and mounted the fuselage on the wing(not glued) to make sure I didn't have any interference, and all seems well. I guess the next step is to put the stab/elevator together. It has the same control horn as the flaps. The short pre-bent rod and spring retainer from the crank fit perfectly on the flap horn, and the flaps have completely frictionless movement.
If you read my post in Ken's Oriental Rework thread, I've been hoping to use a ball link to connect to the elevator horn, but even with the 3/8" spreader installed in the rear of the fuse, there is no room for it. The bolt head, washers and nut would make it too wide. I juggled several options including just using the metric threaded clevis that came with the plane. Or soldering a 4-40 coupling on and using a Sullivan Gold-N-Clevis which has an acceptable rating. I checked and the pin in the Sullivan clevis had just as much slop as the Chinese one. So to hell with it, if it's good enough for John Brodak, it's gonna hafta be good enough for me. Problem swept under the rug. There's nothing in the instructions reminding the builder to adjust for neutral. That's going to be a minor pain... take it off, adjust, put it on, take it off, adjust, put it on, and so on.
Once the stab is built and adjusted I can glue the wing and everything together. As for aligning the wing, I'll use balsa filets on the outside to add to my gluing surface area, since there are some gaps on the inside where I shaved the raised center sheeting to allow for enough twist to get the wing straight. I hope I can get it done as easy as I made that sound. Maybe this weekend.
That's all for now.
Rusty
_________________
...and never Ever think about how good you are at something...
while you're doing it!
My Hot Rock & Blues Playlist
RknRusty- Rest In Peace
- Posts : 10869
Join date : 2011-08-10
Age : 68
Location : South Carolina, USA
Re: Oriental ARF assembly
![]() Ken Cook Thu Jan 15, 2015 4:36 pm
Ken Cook Thu Jan 15, 2015 4:36 pm
Ken Cook- Top Poster
- Posts : 5449
Join date : 2012-03-27
Location : pennsylvania
Re: Oriental ARF assembly
![]() RknRusty Thu Jan 15, 2015 9:18 pm
RknRusty Thu Jan 15, 2015 9:18 pm
For tail weight, I might embed a fat cigar tube with the removable cap outside and fill it with #9 lead shot. From what you and others have written, I'm expecting about 2.5 ounces.
Ken, One question: For ease of routing lines, I would like to slide the tank back from the forward bulkhead an inch. There is plenty of room, but I don't want a long line to make for hard cranking or any other problems. Where do you like to locate your tank? I have the recommended 4oz Brodak tank(BH-559 metal), but if I get one problem with it, I'm switching to the Dubro S-4 clunker. I hope 4oz is enough for the stock 40fp.
Rusty
_________________
...and never Ever think about how good you are at something...
while you're doing it!
My Hot Rock & Blues Playlist
RknRusty- Rest In Peace
- Posts : 10869
Join date : 2011-08-10
Age : 68
Location : South Carolina, USA
Re: Oriental ARF assembly
![]() Ken Cook Fri Jan 16, 2015 3:47 pm
Ken Cook Fri Jan 16, 2015 3:47 pm
As for the fuel tank, I had a metal tank ATF (All tubes forward) in the tank compartment. I had the front of the tank essentially 1/4" from the firewall. The Dubro S-4 I'm currently using is set back a bit due to the plumbing arrangement I have. With the metal tank, I had my overflow in hard pipe directly down the front of the firewall behind the engine. I used small U shaped pins made from music wire essentially the same way you secured your flap horn. This held the piece of copper I used which was about 1 1/2" long with a L bend going through the firewall and into the compartment. I used a small piece of tubing as a coupler. The plastic tank was a bit more difficult to work with. I set it back a little more than 1". I basically try and get it as close as possible to keep the fuel lines the shortest. I also use a H&R fuel filter which is very small about the size of a pencil eraser just outside of the firewall prior to the fuel line taking a 90 deg bend into the spraybar. It's been too cold to test the Dubro I was using. I was getting burn down lean screaming runs. I since did some modifications. I switched out the clunk for a sintered clunk. I also switched to a 2 line system where the pickup and also the uniflow are independent. I had a soldered hitchiker setup prior to where my feed and uniflow were linked together by a Y pipe at the clunk. I can provide pictures.
The FP 40 can be a funny one. It also depends on your version, iron version or ABN. I'm not saying 4 oz's isn't impossible, there are many factors at work. Prop size, plane weight, venturi size, muffler and nitro are all factors. I use 5% nitro with the FP. It can yield approx 2.5 laps over 10% nitro. Dennis the Philly Fliers FP expert has always used the FP and the Tower .40 since I've been with him close to 15 years now. He uses venturi sizes here in the .265"-.272" range. Many use the smaller venturi's to increase fuel economy. I found this to overheat the engine severely and offer a useless amount of power. We like to use the APC 10.5 x 4.5 prop which works very well for us here. The THunder Tiger I sent you is a prop I like to use on the FP due to a bit more blade area. It really comes down to trying it and see what happens. If things go well, no runaway will take place. The FP is however notorious for the runaway. Adding a head gasket or two will help many issues including giving you more fuel economy. It lowers the compression which reduces the power but you can lean the needle in to get back to the same power you once were prior to the gaskets. This will increase your fuel mileage substantially. The main thing is to not trigger the engine into runaway by getting it hot. Let it run where it wants to. This is why the APC with little blade area works well. It still provides decent thrust but doesn't overheat the engine by loading it. Ken
Ken Cook- Top Poster
- Posts : 5449
Join date : 2012-03-27
Location : pennsylvania
Re: Oriental ARF assembly
![]() RknRusty Sat Jan 17, 2015 8:02 pm
RknRusty Sat Jan 17, 2015 8:02 pm
Next the fuse and wing will be joined, as will the stab. It should look like a plane soon now. For the fuselage/wing joint I bought some Gorilla glue. That should swell up and fill the vertical gaps where the saddle and the wing's contour don't match, and also the horizontal gaps between the internal fuse sides at the alignment block, where I removed some wood.
I've never used Gorilla glue before, so I have some test practice pieces setting up tonight. I intentionally left some gaps and i can already tell they are more than full. This stuff really grows. It's the newer white Gorilla glue, but all the literature indicates it's the same as the old brown stuff. I might mix a little sawdust in a couple of spots. I will probably use some epoxy right at the LE and TE joints. And nothing but epoxy on the bottom cap of the wing. Eventually it will get an epoxy/Microballoon filets top and bottom. I wouldn't bother with that if I hadn't had the alignment problem.
So we'll see how that ambitious plan works out. Or maybe tomorrow I'll just fire up a couple of Tach Racers and slouch around the house. I'll probably get some of the above done. See y'all in the funny papers.
Rusty
_________________
...and never Ever think about how good you are at something...
while you're doing it!
My Hot Rock & Blues Playlist
RknRusty- Rest In Peace
- Posts : 10869
Join date : 2011-08-10
Age : 68
Location : South Carolina, USA
Re: Oriental ARF assembly
![]() Cribbs74 Sat Jan 17, 2015 8:25 pm
Cribbs74 Sat Jan 17, 2015 8:25 pm
Lot's of opinions out there on those. I think for large models they are OK. Sometimes a little stiff for CL use, but I find if you work the hinges back and forth after gluing they free up nicely.
One real problem I see is if you plow the model in. The elevator gets thrown forward and the hinges take the stab with it.
Other than that, they work well enough.

Cribbs74- Moderator
-
Posts : 11895
Join date : 2011-10-24
Age : 50
Location : Tuttle, OK
Re: Oriental ARF assembly
![]() RknRusty Sat Jan 17, 2015 10:36 pm
RknRusty Sat Jan 17, 2015 10:36 pm
I just took a break from writing this and went to check on my Gorilla glue test, and Damn, I have a new favorite glue! I know it's really heavy, but my tests were amazing. Gaps filled like crazy. I can bridge all the areas in the wing I was worried about. After only a couple of hours of curing, I broke one 90 degree 3"x1/8" balsa joint, hard Sterling balsa, and only wood broke. And the two sticks I glued face to face with parallel grain took some serious strength to break. And that was just a thin smear between them.
I got so excited I jigged my wing and drew the reference lines on the sheeting to align the fuse. I'm definitely gluing it in the morning. The stab will be ready to install as soon as I can get to it.
Rusty
_________________
...and never Ever think about how good you are at something...
while you're doing it!
My Hot Rock & Blues Playlist
RknRusty- Rest In Peace
- Posts : 10869
Join date : 2011-08-10
Age : 68
Location : South Carolina, USA
Re: Oriental ARF assembly
![]() Ken Cook Sun Jan 18, 2015 3:42 am
Ken Cook Sun Jan 18, 2015 3:42 am
Ken Cook- Top Poster
- Posts : 5449
Join date : 2012-03-27
Location : pennsylvania
Re: Oriental ARF assembly
![]() getback Sun Jan 18, 2015 6:26 am
getback Sun Jan 18, 2015 6:26 am
 Eric
Eric 
getback- Top Poster
-
Posts : 10114
Join date : 2013-01-18
Age : 66
Location : julian , NC
Re: Oriental ARF assembly
![]() RknRusty Sun Jan 18, 2015 8:38 am
RknRusty Sun Jan 18, 2015 8:38 am
Rusty
_________________
...and never Ever think about how good you are at something...
while you're doing it!
My Hot Rock & Blues Playlist
RknRusty- Rest In Peace
- Posts : 10869
Join date : 2011-08-10
Age : 68
Location : South Carolina, USA
Re: Oriental ARF assembly
![]() Ken Cook Sun Jan 18, 2015 11:30 am
Ken Cook Sun Jan 18, 2015 11:30 am
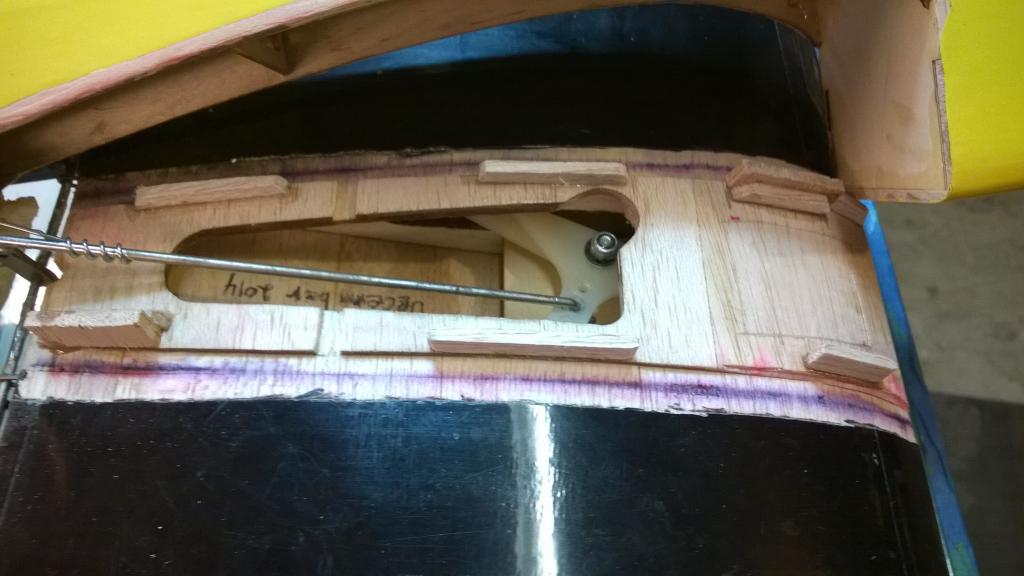
This is ARF #2 with weight box installed for CG issues. While not deep enough to house all the weight entirely, a few things were done to assist. I made the top block over the stab from poplar which added a few grams of assistance. I was also able to glue some smashed 1/4 oz weights internally before gluing in the box. Note the stab reinforcing blocks to support the punky wood provided with the stock kit. The wood is actually too light for this use and the end result is typically failure due to scoring the covering to glue it in properly. Mine broke in flight due to it bumping my launcher's leg upon release.

This is underside shot of the Oriental showing the sheeting which was glued internally. The way the fuse was glued was via the canopy. Top block molded sheeting was removed, 1/4" x 1/4" balsa was laid internally against inside walls of fuse.
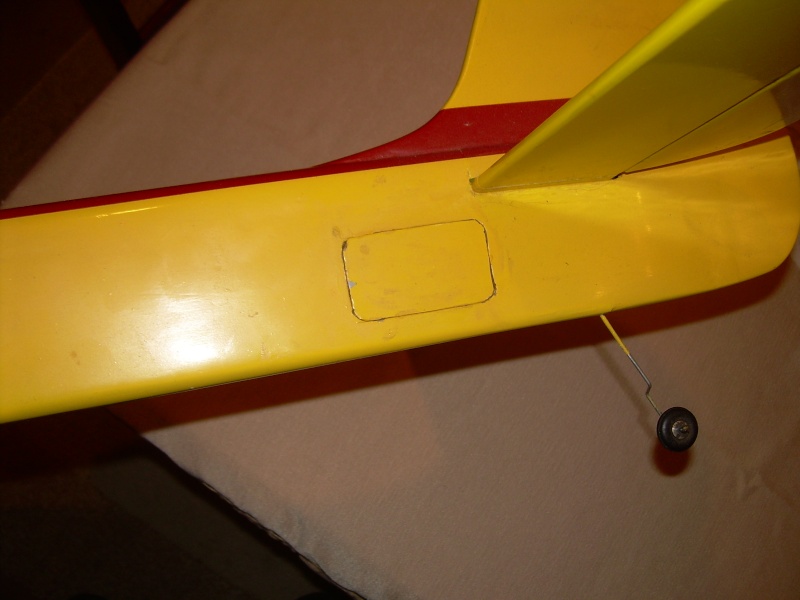
ARF #1 showing clevis access door permanently attached once model was trimmed. No stab reinforcing blocks on side of fuse. This resulted in elevator failure as mentioned above which couldn't be adequately fixed at the field. I slipped 1/64" ply over the top and through the fuse and used fiberglass over top smoothed and sanded. This plane has many issues such as sloppy controls due to the inferior control system supplied. I learned quickly that using the stock parts was a HUGE mistake. This plane is very heavy currently. This is due to oil soaking and repairs. This beast is nearing 50 oz's. This is mostly due to oil soaking. Flies great in the wind however but it feels like your flying a .60 size stunter. I should also mention this is painted with Rustoleum due to covering exiting body and wing during flight.
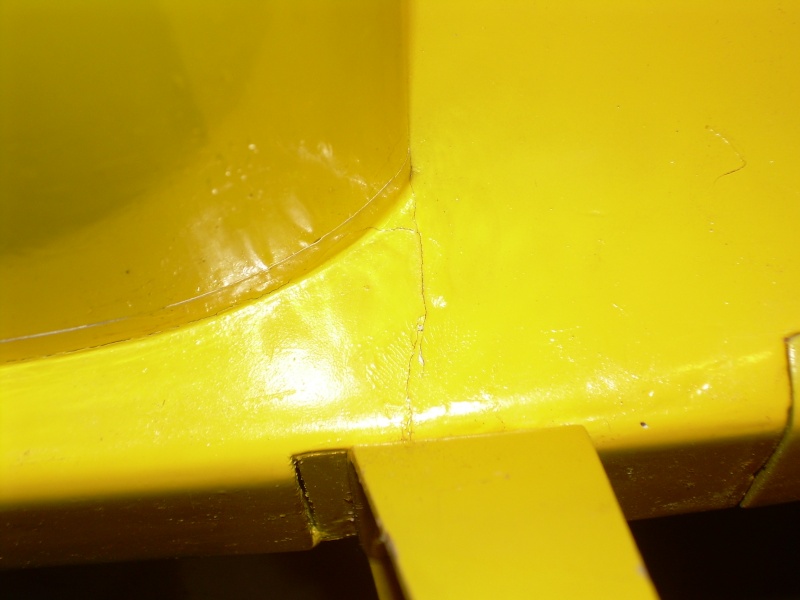
ARF #1 showing the dreaded fuse break which occurs. I mentioned this numerous times. This developed within the first few flights. I really didn't know how to address it at the time aside from pouring CA continuously. ARF #3 has 1/64" ply biscuits backing up the joints and is fiberglassed on the outside.
Ken Cook- Top Poster
- Posts : 5449
Join date : 2012-03-27
Location : pennsylvania
Re: Oriental ARF assembly
![]() RknRusty Sun Feb 08, 2015 7:14 pm
RknRusty Sun Feb 08, 2015 7:14 pm
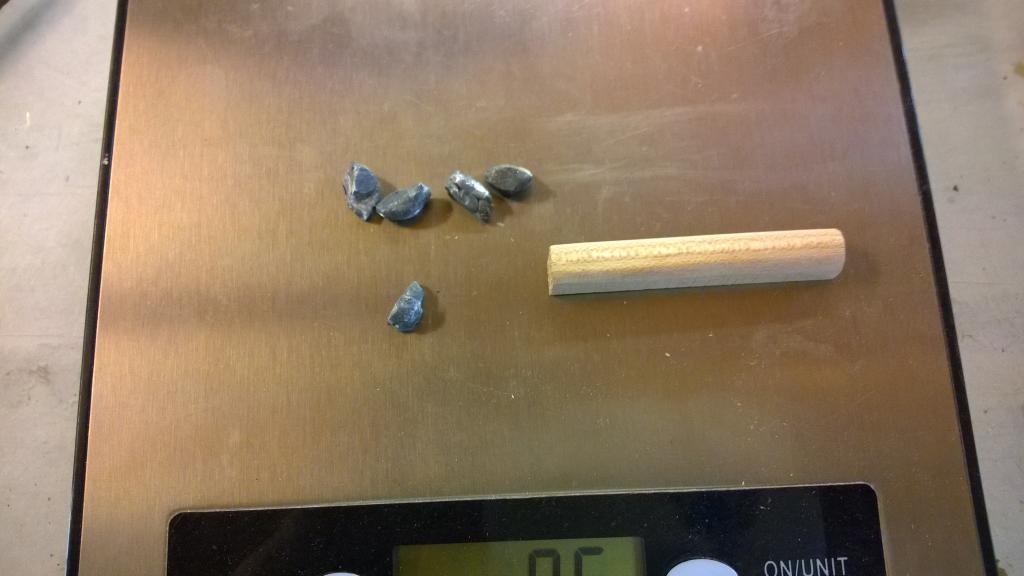
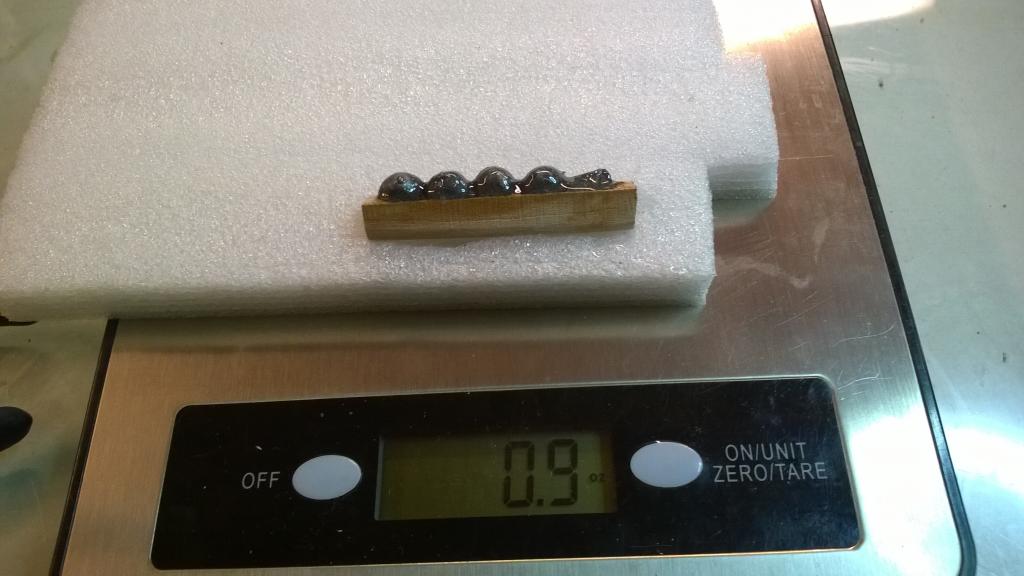
I cut it from a Poplar square dowel, rounded one side and added weight to it. That's a good place for lead since it's far back and has the best leverage. Then hollowed it out and smashed some split shot from my tackle box into shape. I had it all fixed up so it would weigh exactly 1oz. and(I'm glad y'all can't see me work sometimes) flailed around or something, and knocked the damn thing off the table. I couldn't find one of the whole shot. I had cut a bunch in half, another dumb move. So it weighs .9oz. What a maroon.
I am so sick of talking about that wing. Today I glued it in place. For new readers who may have missed it, the ARF's raised strip on the center sheeting was not in line with the fuselage center. This is what aligns and holds the fuselage perpendicular to the wing. This crooked one created all sorts of thinking, asking, and experimenting, and worrying a lot about strength. This is why I opted for the original expanding Gorilla Glue. It's very strong and fills gaps. It looks like the strength distributed across the gaps is a somewhat less than epoxy, but its gap filling ability absolutely outweighed epoxy. My test joints were simply incredible. One of the things I tried was gluing two strips of flat 1/8" balsa together with parallel grain. The next day, after slicing 3/8" of hard foam from the sides(you don't need very much glue), I had to try really really hard to break it in half. It had soaked in and taken over the wood. You must practice several times before using it.
So, here is the wing glued to the fuselage with a straight and square redneck jig and weights holding it in place. I was intentionally a bit heavy handed with the glue. I'd love to see inside, but hopefully I never will. I put vaseline on the flap horn. I added some more wood on the wing. All of it is CAd in place, but I made sure not to let it absorb enough to render it ineffective. Note where I cut back the yellow Monokote to leave room for an epoxy/Microballoon filet. First I will put a small plain epoxy bead along the root. After it hardens I'll build it up with as little filler as I can get away with and still look good. I wonder what would happen if I put some yellow paint in it. Ideas are welcome. Enough blabbing, here're the pics.

_________________
...and never Ever think about how good you are at something...
while you're doing it!
My Hot Rock & Blues Playlist
RknRusty- Rest In Peace
- Posts : 10869
Join date : 2011-08-10
Age : 68
Location : South Carolina, USA
Re: Oriental ARF assembly
![]() Ken Cook Mon Feb 09, 2015 4:45 am
Ken Cook Mon Feb 09, 2015 4:45 am
Ken Cook- Top Poster
- Posts : 5449
Join date : 2012-03-27
Location : pennsylvania
Re: Oriental ARF assembly
![]() RknRusty Tue Feb 10, 2015 8:37 pm
RknRusty Tue Feb 10, 2015 8:37 pm
I spent a while trying to decide if I have more flap deflection than elevator. Hard to tell, looks about 1:1.

I also checked the elevator deflection. It's equal in both directions, I hope it's enough.
Full Down

Full Up

_________________
...and never Ever think about how good you are at something...
while you're doing it!
My Hot Rock & Blues Playlist
RknRusty- Rest In Peace
- Posts : 10869
Join date : 2011-08-10
Age : 68
Location : South Carolina, USA
Re: Oriental ARF assembly
![]() Cribbs74 Tue Feb 10, 2015 10:45 pm
Cribbs74 Tue Feb 10, 2015 10:45 pm
Cribbs74- Moderator
-
Posts : 11895
Join date : 2011-10-24
Age : 50
Location : Tuttle, OK
Page 2 of 5 • 1, 2, 3, 4, 5 ![]()
» Skitzoid Phred here with Brodak ARC Oriental addition to the growing fleet
» Another Oriental shakedown flight
» My Oriental's OS 40fp spraybar
» First patterns with the Oriental - Video