Cox Engines Forum
You are not logged in! Please login or register.

Logged in members see NO ADVERTISEMENTS!


Buidling Miss Ashley Cox_ba12


Buidling Miss Ashley Pixel

Log in

I forgot my password

Search


Display results as :


Rechercher Advanced Search

Latest topics
» Cox Ryan ST 2.0
by GallopingGhostler Yesterday at 11:40 pm

» Blue backplate postage stamp engine
by duaneh Yesterday at 10:52 pm

» Jim Walkers FireBee - This is going to be fun
by rsv1cox Yesterday at 3:45 pm

» Hawk had breakfast and then took a bath
by GallopingGhostler Yesterday at 2:34 pm

» Prop Rod - resto to a runner
by rsv1cox Yesterday at 12:41 pm

» Jim Walker Firebaby
by rsv1cox Yesterday at 12:24 pm

» Internet buy
by Ken Cook Yesterday at 9:15 am

» Artwork for Otto Kuhni
by GallopingGhostler Yesterday at 8:26 am

» Sherline lathe wont run
by getback Yesterday at 7:15 am

» Roddie's water-cooling bottle for bench-running
by roddie Tue May 14, 2024 7:38 pm

» Feed Station Zebra.. Spring 2022
by roddie Tue May 14, 2024 5:59 pm

» **VOTE-ON-THE-NEXT-COX-ENGINE-OF-THE-MONTH** (May 2024)
by GallopingGhostler Tue May 14, 2024 11:12 am

Cox Engine of The Month
May-2024
1/2A Nut's

"Cox Tee Dee .051 RC Marine"


PAST WINNERS
CEF Traveling Engine

Win This Engine!
Gallery


Buidling Miss Ashley Empty
Live on Patrol


Buidling Miss Ashley

Go down

Buidling Miss Ashley Empty Buidling Miss Ashley

Post  Ken Cook Sun May 13, 2012 6:47 am

Recently I was given this kit by a friend to give it a try. The kit itself is nicely laser cut and the wood for the most part was pretty decent. http://www.rsmdistribution.com/index-2.htm Just click on control line kits under 1/2A. For those of us that still use the radial mount Cox engines this plane surely fits the bill. Most of the earlier kits designed around the Bee series engines had actually fairly small wingspans. This particular plane is considerably larger. This is the first laser cut kit I've built in 1/2A. The wing itself went together easy with a few minor glitches. The leading edge and the trailing edge of this wing are just 1/4 x 1/4 spar material. In order to fit into the box correctly, the spars are in two pieces. This was easily fixed by substituting those parts for a spar that ran the whole length. Not only does this make the wing technically stronger but by selecting a straight piece it just makes the build straight as well. I used the leading edge material provided in the kit but did substitute the trailing for one solid piece. Since the leading and trailing edge is square stock this requires them to be sanded to shape. For those unfamiliar, sanding the leading edge very blunt and round is far superior to a leading edge coming to a point. Having such a delicate wing can really be a test of patience trying not to break any ribs in the sanding process. Overall the plane is quite nice for one of these engines and I'm looking forward to see how it flies. I decided after the wing was 75% complete to cut a new fuselage. Even though I think the plane would certainly be quite a performer with a decent Golden Bee or hopped up Black Widow, I want to go with a .049 Medallion. I feel the Brodak MK 1 in the .049 or .061 (first version) would also be a good selection. I now have to extend the nose a bit to accomodate the room needed for a tank. I try and hit the cg correctly during the build so I may have to play with the tail length of the fuse as well. Another option would be to use the Sure Start with the production backplate which would pull the nose back as it's not in front as much as the extended tank Bee's. I don't feel the need for a real hot rod engine on this plane. It has good sq inches and light weight and should truly be a good flyer. I will try and get some build pics on the site as I'm nearing the bellcrank installation process soon. Without modifications this plane builds well and certainly makes a good stepping stone for those wanting to step up a notch. Ken
Ken Cook
Ken Cook
Top Poster
Top Poster

Posts : 5485
Join date : 2012-03-27
Location : pennsylvania

Back to top Go down

Buidling Miss Ashley Empty Re: Buidling Miss Ashley

Post  Kim Sun May 13, 2012 7:20 am

Good deal! Looking forward to the build details, and flying report!
Kim
Kim
Top Poster
Top Poster

2022 Supporter

2023 Supporter

2024 Supporter

Posts : 8536
Join date : 2011-09-06
Location : South East Missouri

Back to top Go down

Buidling Miss Ashley Empty Re: Buidling Miss Ashley

Post  Ken Cook Mon May 14, 2012 4:26 pm

I've provided some pictures of my new build. I've changed the bellcrank platform to a larger piece of ply. I've also opted to change out the wood bellcrank that came with the kit for a nylon bellcrank. In the one picture where I have a pencil pointing to the plan, you can see the very small bellcrank platform. Although this may be strong enough to fly, I'm sure it would rip through the ribs if the plane lost line tension then regained. My new platform is captured on both ribs and the web spar in the middle of the wing. Showing the opposing side of the wing, I place 2 pieces of 3/16 x 3/16 light balsa under the platform glued to both ribs. The lighter material sands easier to the shape of the ribs. This will allow more glue area for the platform and also the center sheeting making a sound area for the bellcrank. I wasn't happy with the 1/16th wingtips so I switched them out for 1/8th. A good weight saving tip is to eliminate it where you don't need it. These tips are solid and I see no need strength wise for it so I removed all the inner material as shown on the outboard wingtip. Whenever removing material like I did its always a good idea to radius all corners. While working on one part I like to jump to the other parts while something is drying. I started on the elevators. I like to really thin and taper all of my stab and elevator areas. Prior to sanding, I decided to use my stitched hinges for this build. I use dental floss sewn in figure 8's for hinges. This material is extremely strong and flexible. I never had hinges as free as these. Using the unwaxed variety is needed. I provided a picture of my Baby Clown arf with the dental floss hinges. On the clown I wasn't too concerned on how pretty it looked. The stock hinges were of the CA variety and these are a poor choice for control line use as they're just too stiff. Having stab and elevator areas already covered didn't leave me much of an option to put on hinges so the stitching worked well here. I can really do a nice tasteful job if I take my time doing it. What I've done in the picture with the elevator and stab was to glue a strip of 1/8" x 3/16" piece of basswood across the leading edge of the elevator and the trailing edge of the stab. This will stiffen both of these pieces and also allow for a strong area for me to stitch onto. I prefer doing this even if I'm going to use cloth hinges as it really prevents warping and breaking on flip over landings. It hardly adds any weight and is simple to do. The next step is the fuse. I'm going to alter the fuse by lengthening the nose to allow for a tank to be installed. I'm also going for a beam mounted engine and this will require two beams 1/4 x 1/4 maple. To save a bit of weight, I will install 1/64th ply on the sides of the fuse for doublers. The ply doublers will extend back onto the wing and terminate at the web spar that runs across the center of the wing. Ken
Buidling Miss Ashley Dscn1443
Buidling Miss Ashley Dscn1444
Buidling Miss Ashley Dscn1445

Buidling Miss Ashley Dscn1447
Buidling Miss Ashley Dscn1448
Buidling Miss Ashley Dscn1449
Ken Cook
Ken Cook
Top Poster
Top Poster

Posts : 5485
Join date : 2012-03-27
Location : pennsylvania

Back to top Go down

Buidling Miss Ashley Empty Re: Buidling Miss Ashley

Post  Kim Mon May 14, 2012 5:26 pm

Looks great! Just a thought...you might consider throwing a couple hinge stitches just inboard of the elevator horn. This would help the horn smoothly convert the "push" to "torque" along the hinge line.
Kim
Kim
Top Poster
Top Poster

2022 Supporter

2023 Supporter

2024 Supporter

Posts : 8536
Join date : 2011-09-06
Location : South East Missouri

Back to top Go down

Buidling Miss Ashley Empty Re: Buidling Miss Ashley

Post  Ken Cook Mon May 14, 2012 5:53 pm

I plan on using Coverlite from Black Baron. This is a synthetic tissue like material that I have in red and yellow. It looks promising. The fuse may just be a clear finish with tissue. The Cox Medallion .049 is probably going to be the engine of choice. My engine is basically stock with a single Bee type cylinder. I could always go with a Sure Start cylinder and get a little more pep in her step. Ken
Ken Cook
Ken Cook
Top Poster
Top Poster

Posts : 5485
Join date : 2012-03-27
Location : pennsylvania

Back to top Go down

Buidling Miss Ashley Empty Re: Buidling Miss Ashley

Post  Ken Cook Mon May 14, 2012 8:12 pm

Hello Kim, that is a good point you made. In the case of the clown I can see that even being more of a issue. The wood is quite light and flexing could certainly occur. The pushrod wire they used was horrific and I switched it out for my own. On Miss Ashley, I was going to use a small nylon ball link which I found to work great on 1/2A's. I think with the added piece of bass across the leading edge of the stab would stiffen it and possibly alleviate any flexing. Nonetheless, I will lay out the holes for the stitches closer to the horn in this example. I'm experimenting with lengthening the tail a additional 1 1/2" due to the nose extension. I'm going to mock up the stock fuse with the engine of choice and see where the cg falls. Ken
Ken Cook
Ken Cook
Top Poster
Top Poster

Posts : 5485
Join date : 2012-03-27
Location : pennsylvania

Back to top Go down

Buidling Miss Ashley Empty Buidling Miss Ashley

Post  Ken Cook Thu May 31, 2012 7:25 am

This has been a slow build for me but I'm making progress. Today I cut a new fuselage. I try to select a harder and denser piece when making the fuse. Most kit wood is very punky and useless when it comes to the integral part of the airframe. I just use the kit fuse as a template.

In the case of this build, I noticed the plane had similar lines to a larger profile kitted by Midwest "The Magician". I wanted to retain those lines as it has a longer nose and long tail which extends beyond the stab and elevator. This was a good choice due to the Cox medallion needing a bit of room and the Perfect tank sitting behind it requiring a additional 1 3/4" as well. This took two attempts to make a fuse for this plane. Seems like a lot of work but its always good to keep additional lumber on hand.

While the 1/4"x1/4" maple engine bearers are drying, I decided to start making the doublers. Keep in mind, poplar could've been substituted for the engine bearers and this certainly could've saved weight. The compromise is that the poplar could crush. I elected to use 1/64th ply for the doublers. Most kits would have use 1/32, in my experience this is not only lighter but just seems to have better workability and is quite strong. This ply can be easily trimmed accurately using a pair of sharp scissors.

This plane is going to require gear to be bent and I typically use 1/16th wire. For those that have never experienced this, there isn't a commercially available landing gear strap made for this size wire(as far as I know). Some Brodak kits use copper wire either soldered or bound with glue to attach the gear to the fuse. This is accomplished by drilling small holes through the fuse and sewn around. Yes it works, probably not the most attractive. The other downside is that in the event the gear needs to be swung forward or rearwards it just isn't going to happen without surgery. I take 3/32 copper tubing about 1/2 long and slip it onto the gear wire prior to bending the gear. This not only looks pretty clean it also allows you to use a 3/32 nylon Dubro landing gear strap.

The small wedge Perfect tank is also going to be problematic on this one as well. The fuel pickup line where it exits the tank is directly into the back of the cylinder. Sometimes, I'll just take weed whacker line and insert it into the pickup pipe and proceed to bend it downwards then remove the line then check for leaks. This is going to take a bit or rework and I will do the required cut and chop as needed. Unfortunately, my camera is on a camping trip with my daughter so hopefully I will have some additional pics when she gets home. Ken


Last edited by shawn cook on Thu May 31, 2012 12:50 pm; edited 1 time in total
Ken Cook
Ken Cook
Top Poster
Top Poster

Posts : 5485
Join date : 2012-03-27
Location : pennsylvania

Back to top Go down

Buidling Miss Ashley Empty Re: Buidling Miss Ashley

Post  RknRusty Thu May 31, 2012 9:37 am

Thanks for the build thread. And for the tip with the weed whacker line. If, and that's a big if, I use my wedge tank I'll have the same problem. I'll probably mount a bladder where the wedge is supposed to go.

_________________
Don't Panic!
...and never Ever think about how good you are at something...
while you're doing it!


My Hot Rock & Blues Playlist
RknRusty
RknRusty
Rest In Peace
Rest In Peace

Posts : 10869
Join date : 2011-08-10
Age : 68
Location : South Carolina, USA

Back to top Go down

Buidling Miss Ashley Empty Re: Buidling Miss Ashley

Post  Ken Cook Thu May 31, 2012 12:49 pm

Rusty, I have two tanks on hand currently for this plane. The wedge I want to use places the feed line directly into the cylinder as mentioned above. The other is a much wider wedge and places the feed line out towards the tip of the plug. The second will work, but I dislike having the fuel line loop to the outside and then back in. I've had nothing but trouble when running a TD using a tank like the second one. I'm using the Medallion so I'm hoping it will be more suitable for this arrangement. Now if I was running a TD, I certainly would opt for the bladder. Ken
Ken Cook
Ken Cook
Top Poster
Top Poster

Posts : 5485
Join date : 2012-03-27
Location : pennsylvania

Back to top Go down

Buidling Miss Ashley Empty Re: Buidling Miss Ashley

Post  Ken Cook Wed Aug 15, 2012 1:45 pm

I certainly don't build anything with any great speed. I also don't use CA adhesive as I'm a yellow / white glue and Ambroid builder. The only epoxy I used on this build was the bellcrank mount. I suppose there was a time when I was trying to get whatever I was building completed for the following week. The one thing about this hobby is that once you settled on a really cool project, something blows it out the water and you now fixate on a new one leaving 3 others unfinished. My goal is to eventually fly the pattern competitively using a 1/2A. I certainly feel from a cool factor, Cox engines would be of choice considering the majority of my hobby and entrance to this hobby was using these engines. As problematic as that may be at times, over the years I've discovered what makes these engines tick and I'm confident in my goal. The Miss Ashley has once again been on my to do list and I made great strides the past few days.

The Miss Ashley kit out of the box is quite small and I provided a picture of the stock fuse on top of my new extended version. I changed my plane in several ways. I extended the nose to give it the Midwest Magician appearance and I followed suit with the tail. In addition, I elevated the stab to a 1/2" above the C/L of wing for the Magician appearance as well. The rudder in the picture is the stock rudder which doesn't represent a Midwest Magician but rather the Charles Mackey design that Brodak now kits in their .25 size plane. I'm up in the air with my rudder decision.

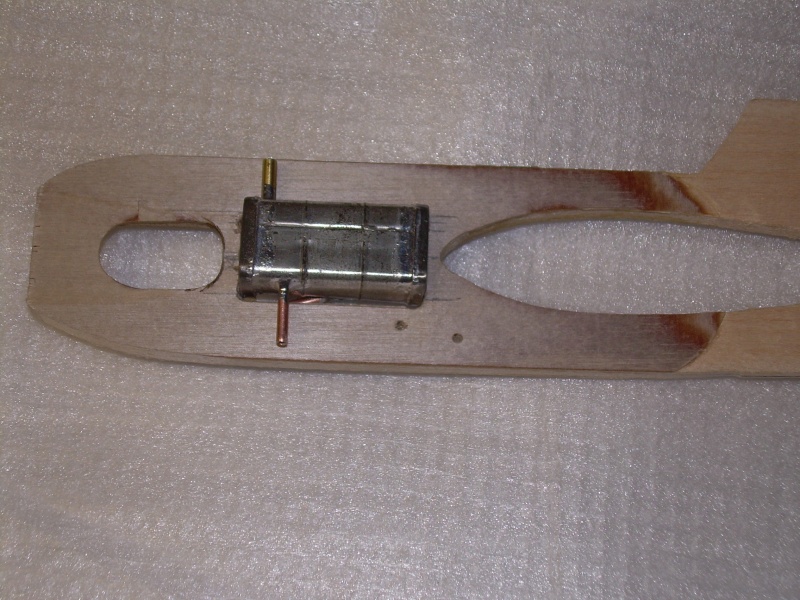
I've added fixed flaps to increase the wing area and to also assist in balancing. The picture here has all the parts dry fit and nothing is glued as far as the wing and stab etc. The leading edge has been sanded extremely blunt as this provides a more desirable airfoil for stunt. I bent the gear up and set it so the wheels are slightly ahead of the leading edge so that it prevents flip overs and cartwheels on landings. Installing short pieces of 3/32" tubing on your gear wire prior to bending any angles allows for stock off the shelf nylon landing gear supports to work. My next task is still undecided as well. I may rout out the doubler on the engine side so that the tank will set partially into the fuse. Using a wedge tank as I stated really places the pickup outboard. Doing what I just suggested will move the tanks pickup 1/4" closer to the engine. I can then place 1/8" aluminum pads under the engine to shim it off the fuse. As minor as this sounds in terms of total distance, it really has a positive effect on the engine and it's run.

I'm also playing with the decision to cutout the fuse behind the engine and have the tank only protruding about a 1/2" on the outboard side while the majority of the tank will be protruding out the inboard side. This will place the pickup inline to the fuel nipple on the Medallion and this would have a great benefit if I decided the TD was needed as this would certainly solve fuel draw issues. I hope to have the model completed in the next week. The next step is tapering the fuse and elevators followed by dope and silkspan. Ken
Buidling Miss Ashley Dscn1516
Buidling Miss Ashley Dscn1517
Buidling Miss Ashley Dscn1518
Buidling Miss Ashley Dscn1519
Ken Cook
Ken Cook
Top Poster
Top Poster

Posts : 5485
Join date : 2012-03-27
Location : pennsylvania

Back to top Go down

Buidling Miss Ashley Empty Re: Buidling Miss Ashley

Post  Cribbs74 Wed Aug 15, 2012 2:40 pm

Hey Ken,

I don't know how I missed this thread! Nice build and I appreciate the in depth write ups you provided. It will go a long way in helping me with my builds. Can't wait to see the finished product and the subsequent flight report.

Bravo!

Ron
Cribbs74
Cribbs74
Moderator

2022 Supporter

2023 Supporter

2024 Supporter

Posts : 11897
Join date : 2011-10-24
Age : 50
Location : Tuttle, OK

Back to top Go down

Buidling Miss Ashley Empty Re: Buidling Miss Ashley

Post  Ken Cook Wed Aug 15, 2012 4:35 pm

Thanks Ron, something that I realized now that once again is too late is that the elevator can't be joined to the stab. The cutout in the fuse will not allow the whole assembly to be put together and then glued in. I will have to sew the elevator onto the stab afterwards which isn't impossible. I really like to do this last so that no paint gets into the stitching. I've tried many methods in the past on trying to finish the plane. It always seems to come back as building as one assembly then finishing. I have done many planes prior using iron on coverings and building them ARF style.

I do though like to use epoxy and micro balloon fillets. I find the product extremely easy to use, self leveling, lightweight and it just gives you that finished appearance that just looks good. It does take practice and I only lightly sand it prior to accepting paint. I've learned how to use this product without sanding it so that it has no ridge where it starts. Ken
Ken Cook
Ken Cook
Top Poster
Top Poster

Posts : 5485
Join date : 2012-03-27
Location : pennsylvania

Back to top Go down

Buidling Miss Ashley Empty Re: Buidling Miss Ashley

Post  RknRusty Wed Aug 15, 2012 5:48 pm

It looks really good. I wish I had something helpful to add, but your modeling skills are way ahead of mine. So like Ron said, your writeup will serve to help me with decisions on my future builds.

What I like:
The way the nose isn't completely cut out with a slot for the beam mount. I could have filled in the slot with wood on my recent beam style model, but lo, it's now filled with lead.

I also like the idea of imbedding the tank into the fuse. It helps use the force pushing the fuel to the outboard, rather than fight it, and is good planning in case a Tee Dee needs to feed off of it. Hopefully cutting into the doublers won't compromise the strength of the nose.

I like the look of the rudder. As I understand it, the rudder is a rather non-critical part and some planes fly just as well without one, allowing the builder some artistic latitude. And I like the curves you put on yours.

I've also never sewed the elevator to the stab, but have bookmarked some articles about it. I'm tired of seeing the cloth hinges that can't easily be hidden, so if they must be seen, a professional stitching job will look superb.

I imagine the additional flaps can only help stability and acrobatics, especially with that nice fat airfoil. And they add to the streamlined look as well.

What I don't like: ...well, nothing. It's sweet, can't wait to see it finished.

_________________
Don't Panic!
...and never Ever think about how good you are at something...
while you're doing it!


My Hot Rock & Blues Playlist
RknRusty
RknRusty
Rest In Peace
Rest In Peace

Posts : 10869
Join date : 2011-08-10
Age : 68
Location : South Carolina, USA

Back to top Go down

Buidling Miss Ashley Empty Re: Buidling Miss Ashley

Post  Ken Cook Wed Aug 15, 2012 7:02 pm

Thank you Rusty, currently the plane is almost ready for assembly. Things that always bugged me, sheeting not properly edge jointed (you can see the joints through the covering) where the sheet butts the leading and trailing edge (steps that form here due to not being properly aligned of sanded). These are reasons for my glue choices as you can sand Ambroid. While yellow glue isn't the easiest to sand it will sand. I jumped the gun on my doublers prior to gluing the 1/64th ply on. I usually sand so much where the doubler ends, it usually looks like it just blends into the fuse. I didn't this time accidentally and now have a step there. I really taper the fuse usually to the thickness of the rudder in the rear. In order to keep the fuse strong and resist flexing I silkspan the entire fuse. I have a lot of tapering and rounding to do which will certainly look appealing.

Early today I took the tank apart and replumbed. In order to bury the tank into the fuse, the overflow pipe is in the way and had to be moved. I switch all tubes to copper and I replumb with 3/32". This allows small fuel tubing to adequately hold instead of the real tiny tubing that Perfect uses. I've never had success with converting these into a uniflow setup. I'm going to try it anyhow as it would certainly give the best suitable runs you could achieve using a tank. Ken
Ken Cook
Ken Cook
Top Poster
Top Poster

Posts : 5485
Join date : 2012-03-27
Location : pennsylvania

Back to top Go down

Buidling Miss Ashley Empty Re: Buidling Miss Ashley

Post  Ken Cook Sat Jan 26, 2013 6:29 pm

Sadly enough, I've been procrastinating on my builds as one usually takes a back seat to the other before the first one gets finished. This is quite embarrassing and this 1/2A should've been completed months ago. Anyhow, I was at a point with the tank when the pickup tube ran directly into the rear of the cylinder. I did bend it out of the way as I mentioned above in the earlier posts. This looked like crap. It was not a pretty fix and I'm just not a fan of a wedge tank like this on profiles as it always causes a problem. I just hate the way the fuel pickup is way outboard . It has the fuel line flopping in the air, it usually is being exposed to the hot exhaust which can burn the line and it looks terrible. I like clean direct approaches when doing my tanks.

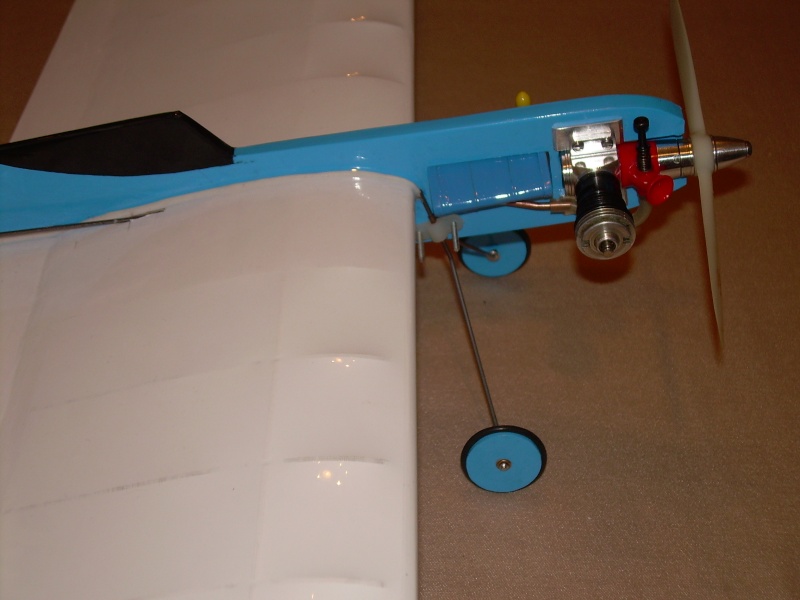
I also have had tremendous amounts of problems when trying to use these tanks with a TD for instance. The TD just isn't completely happy on draw. It lacks vacuum due to the large venturi and is much happier on pressure unless certain steps and procedures are taken. I went with the wedge on the Miss Ashley and I cut the fuse between the bearers and installed the wedge from the inboard side. The furthest point of the wedge is inline with the TD spraybar. I did do a thorough rebuild of the tank which I ran out of copper tubing and had to substitute a piece of brass for the fill pipe. SHHH!!! don't tell anyone. I'm not a fan of the 3/32" inch tubing on the Perfect tanks. The pickup was removed from where it exited the front of the tank due to it running into the rear of the cylinder head. Now it has a clean straight run to the fuel nipple. I made the fill 1/8" but the pickup and overflow is 3/32". Generally I replace the fill pipes with 1/8" due to making filling with my standard syringe. I provided some pictures. My engine bearers run to the rear of my tank cutout so no strength issues are lost to this method. The tank will be tacked in for trial flights to check for proper height and performance before being totally glue in. I never painted a tank before but I feel this one would certainly benefit from doing so. I hope this solves my quest for the perfect (no pun intended) tank run.

I just want to give special thanks to the originator of the post "Unfinished Project Syndrome" that has many of us stalled on projects as this one needs to be completed. Ken
Buidling Miss Ashley Dscn1713
Buidling Miss Ashley Dscn1714
Buidling Miss Ashley Dscn1715
Buidling Miss Ashley Dscn1716
Ken Cook
Ken Cook
Top Poster
Top Poster

Posts : 5485
Join date : 2012-03-27
Location : pennsylvania

Back to top Go down

Buidling Miss Ashley Empty Re: Buidling Miss Ashley

Post  Cribbs74 Sat Jan 26, 2013 9:17 pm

Very good idea Ken, not much longer from this point!

Cribbs74
Cribbs74
Moderator

2022 Supporter

2023 Supporter

2024 Supporter

Posts : 11897
Join date : 2011-10-24
Age : 50
Location : Tuttle, OK

Back to top Go down

Buidling Miss Ashley Empty Re: Buidling Miss Ashley

Post  Ken Cook Sat Mar 02, 2013 10:54 am

Well this has been a long build. I had many plans to do certain coverings and paint, but day to day events just kept pushing this one aside. Unfortunately, it turned cold and the opportunity was lost in regards to doping the plane. I've had good success doping in the cold, but the thinner needs to be different as the temps now are in the 30's. I'm out of my hotter thinner and leaving the plane outdoors is not recommended while bringing it indoors afterwards is also not a good idea due to smell. Tomorrow I fly the plane and I'm hoping for the possibility of doing the pattern with the plane. I have growing concerns for tank capacity. This engine is brand new with a #2 single ported cylinder which I hope improves fuel economy. Hopefully this tank configuration solves my problematic fuel draw issues with a TD as well. I hope to try this with a TD if power is an issue.

Due to weather my final covering was entirely with Monokote. If I realized that this was going to be done, I would've pre-covered all parts prior to assembly. The finished weight with engine is at 6 oz's. I hope it flies good as tomorrow will tell. Ken


Buidling Miss Ashley Dscn1710
Buidling Miss Ashley Dscn1711
Ken Cook
Ken Cook
Top Poster
Top Poster

Posts : 5485
Join date : 2012-03-27
Location : pennsylvania

Back to top Go down

Buidling Miss Ashley Empty Re: Buidling Miss Ashley

Post  crankbndr Sat Mar 02, 2013 11:13 am

Very nice, could you get a macro of your engine mounting? That looks interesting also.
crankbndr
crankbndr
Top Poster
Top Poster

Posts : 3073
Join date : 2011-12-10
Location : Homestead FL

Back to top Go down

Buidling Miss Ashley Empty Re: Buidling Miss Ashley

Post  MeerschaumSteve Sat Mar 02, 2013 11:50 am

You did a really great job on this build!

I like your metal engine mount pad idea.
MeerschaumSteve
MeerschaumSteve
Gold Member
Gold Member

Posts : 121
Join date : 2012-10-21
Location : Oklahoma

Back to top Go down

Buidling Miss Ashley Empty Re: Buidling Miss Ashley

Post  RknRusty Sat Mar 02, 2013 2:03 pm

crankbndr wrote:Very nice, could you get a macro of your engine mounting? That looks interesting also.
MeerschaumSteve wrote:You did a really great job on this build!

I like your metal engine mount pad idea.
I like to use aluminum outside bearers too, on both sides. I think ken tapers his inboard ones so as to eliminate washers for thrust offset. It also keeps the mounting tabs from flexing and possibly damaging them or even the crankcase. I want to do that for the Shoestring but I need some harder aluminum.

_________________
Don't Panic!
...and never Ever think about how good you are at something...
while you're doing it!


My Hot Rock & Blues Playlist
RknRusty
RknRusty
Rest In Peace
Rest In Peace

Posts : 10869
Join date : 2011-08-10
Age : 68
Location : South Carolina, USA

Back to top Go down

Buidling Miss Ashley Empty Re: Buidling Miss Ashley

Post  Cribbs74 Sat Mar 02, 2013 4:38 pm

Turned out real nice Ken. Let us know how it flies!

Ron
Cribbs74
Cribbs74
Moderator

2022 Supporter

2023 Supporter

2024 Supporter

Posts : 11897
Join date : 2011-10-24
Age : 50
Location : Tuttle, OK

Back to top Go down

Buidling Miss Ashley Empty Re: Buidling Miss Ashley

Post  Sponsored content


Sponsored content


Back to top Go down

Back to top

- Similar topics

 
Permissions in this forum:
You cannot reply to topics in this forum