

 Rules
Rules
by aspeed Today at 10:06 pm
» Happy Anzac Day!
by 706jim Today at 8:44 pm
» Project Cox .049 r/c & Citabrian Champion
by MauricioB Today at 6:08 pm
» Jim Walkers FireBee - This is going to be fun
by rsv1cox Today at 5:56 pm
» Revivng Some Childhood Classics
by rsv1cox Today at 9:17 am
» Introducing our Cox .049 TD Engines
by getback Today at 8:20 am
» Roddie's flat-bottomed boat..
by Levent Suberk Today at 2:23 am
» Cox powered jet-pump for model Sprint Boat
by roddie Today at 12:25 am
» Micro Draco Gets to Fly on a Beautiful Morning.
by rdw777 Yesterday at 10:15 pm
» Jim Walker Firebaby
by rdw777 Yesterday at 10:06 pm
» Hydro-bat by Vic Smeed: engine probs
by GallopingGhostler Yesterday at 7:12 pm
» Roddie-Rigger.. a 2005 original design
by roddie Yesterday at 5:39 pm


3D Printing
Page 2 of 4 •  1, 2, 3, 4
 ![]()
Re: 3D Printing
![]() ian1954 Sun Dec 08, 2013 8:08 pm
ian1954 Sun Dec 08, 2013 8:08 pm

ian1954- Diamond Member

- Posts : 2688
Join date : 2011-11-16
Age : 69
Location : England
Re: 3D Printing
![]() pkrankow Sun Dec 08, 2013 8:31 pm
pkrankow Sun Dec 08, 2013 8:31 pm
Phil

pkrankow- Top Poster

- Posts : 3025
Join date : 2012-10-02
Location : Ohio
Re: 3D Printing
![]() dckrsn Sun Dec 08, 2013 10:13 pm
dckrsn Sun Dec 08, 2013 10:13 pm
all the little bits attached.

Bob

dckrsn- Diamond Member
- Posts : 2750
Join date : 2010-10-21
Age : 71
Location : Long Island, New York
Re: 3D Printing
![]() Cribbs74 Sun Dec 08, 2013 10:20 pm
Cribbs74 Sun Dec 08, 2013 10:20 pm


Cribbs74- Moderator


Posts : 11895
Join date : 2011-10-24
Age : 50
Location : Tuttle, OK

dckrsn- Diamond Member
- Posts : 2750
Join date : 2010-10-21
Age : 71
Location : Long Island, New York
Re: 3D Printing
![]() ian1954 Mon Dec 09, 2013 5:43 pm
ian1954 Mon Dec 09, 2013 5:43 pm
Here it is ready to use.
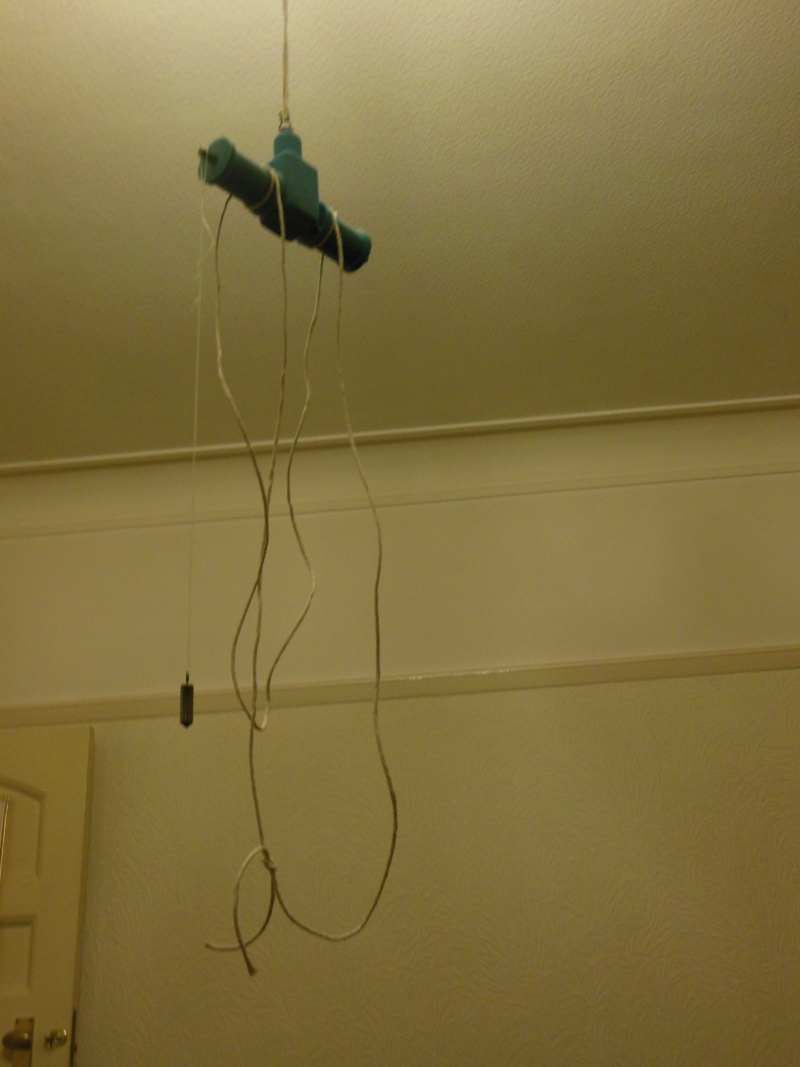
He'd fly through the air with the greatest of ease, That daring old man on the flying trapeze.
ian1954- Diamond Member
- Posts : 2688
Join date : 2011-11-16
Age : 69
Location : England
Re: 3D Printing
![]() Cribbs74 Mon Dec 09, 2013 6:25 pm
Cribbs74 Mon Dec 09, 2013 6:25 pm
Hmm, model airplane storage? Some kind of hangar hanger perhaps?
Spray paint lazy susan?
Cribbs74- Moderator
-
Posts : 11895
Join date : 2011-10-24
Age : 50
Location : Tuttle, OK
ian1954- Diamond Member
- Posts : 2688
Join date : 2011-11-16
Age : 69
Location : England
Re: 3D Printing
![]() pkrankow Mon Dec 09, 2013 6:49 pm
pkrankow Mon Dec 09, 2013 6:49 pm
Phil
pkrankow- Top Poster
- Posts : 3025
Join date : 2012-10-02
Location : Ohio
Re: 3D Printing
![]() ian1954 Mon Dec 09, 2013 6:53 pm
ian1954 Mon Dec 09, 2013 6:53 pm
pkrankow wrote:So it is a sort of center of gravity measuring device?
Phil
A very accurate centre of gravity measuring device?
ian1954- Diamond Member
- Posts : 2688
Join date : 2011-11-16
Age : 69
Location : England
Re: 3D Printing
![]() pkrankow Mon Dec 09, 2013 7:19 pm
pkrankow Mon Dec 09, 2013 7:19 pm
ian1954 wrote:pkrankow wrote:So it is a sort of center of gravity measuring device?
Phil
A very accurate centre of gravity measuring device?
It seems you type with a British accent. (center vs centre)
Yes, on reviewing the video I see the function of it.
Phil
pkrankow- Top Poster
- Posts : 3025
Join date : 2012-10-02
Location : Ohio
Re: 3D Printing
![]() ian1954 Mon Dec 09, 2013 7:26 pm
ian1954 Mon Dec 09, 2013 7:26 pm
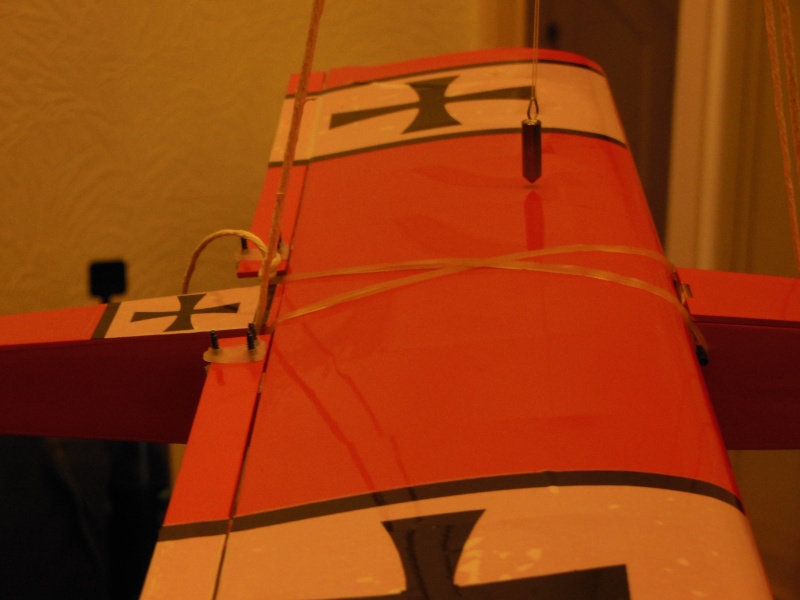
It was tail heavy - how do I know? I had a disastrous flight with it after following the instructions on the kit for the CoG position! It said 100mm (4") behind the leading edge. I thought it strange and soon found how uncontrollable a tail heavy aeroplane is! Followed by the walk of shame!
You set the trapeze so that the model is at its flying level position or (tech. speak) its datum line is horizontal.
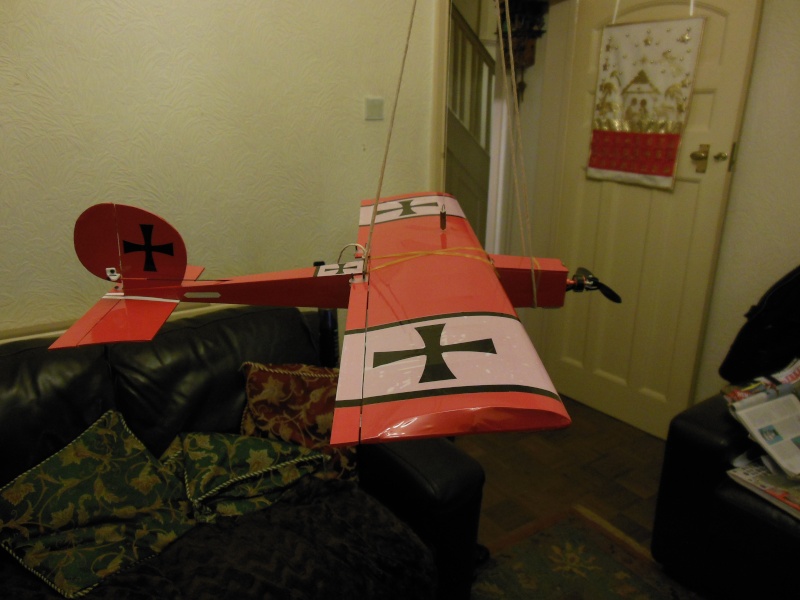
Once level, the plumb line will indicate the centre of gravity. These pictures are after adding 15g of weight to the front.
ian1954- Diamond Member
- Posts : 2688
Join date : 2011-11-16
Age : 69
Location : England
pkrankow- Top Poster
- Posts : 3025
Join date : 2012-10-02
Location : Ohio
Re: 3D Printing
![]() ian1954 Tue Dec 10, 2013 12:53 pm
ian1954 Tue Dec 10, 2013 12:53 pm
The strings are looped around the bobbins to prevent them slipping but the bearings allow the plane to settle. The strings are then adjusted on the plane to bring it flight level. As you move the strings the bobbins turn freely but the string doesn't slip.
As you adjust the strings and the plane stays level (it is still free to rotate) the plumb bob indicates the C of G.
Add weight to the nose and the plane will tip forward.
Adjust the position of the strings on the plane again to bring it level and the plumb bob will indicate the new C of G further forward.
The strings must not slip freely or the plane will nose down or tail up!
Simply sliding the strings forwards or backwards on the plane brings it level and the freely rotating bobbins automatically adjust the strings so that the bobbins are directly over the C of G.
The freely rotating bearings allow the minutest adjustment, the bobbins (and the loop around them) prevent the strings slipping.
The C of G is not indicated until the plane is level.
ian1954- Diamond Member
- Posts : 2688
Join date : 2011-11-16
Age : 69
Location : England

Jason_WI- Top Poster
-
Posts : 3123
Join date : 2011-10-10
Age : 48
Location : Neenah, WI
Re: 3D Printing
![]() Cribbs74 Sun Dec 22, 2013 8:05 am
Cribbs74 Sun Dec 22, 2013 8:05 am
That looks very good Jason! What color is it? It appears to be grey in the picture.
Ron
Cribbs74- Moderator
-
Posts : 11895
Join date : 2011-10-24
Age : 50
Location : Tuttle, OK
Re: 3D Printing
![]() Jason_WI Sun Dec 22, 2013 11:00 am
Jason_WI Sun Dec 22, 2013 11:00 am
Jason_WI- Top Poster
-
Posts : 3123
Join date : 2011-10-10
Age : 48
Location : Neenah, WI
Re: 3D Printing
![]() ian1954 Sun Dec 22, 2013 1:22 pm
ian1954 Sun Dec 22, 2013 1:22 pm
When I get a little more time I will post a few more pictures.
I joined Gabcad the other day but find "searching" on there a little difficult.
ian1954- Diamond Member
- Posts : 2688
Join date : 2011-11-16
Age : 69
Location : England
Re: 3D Printing
![]() RknRusty Sun Dec 22, 2013 3:53 pm
RknRusty Sun Dec 22, 2013 3:53 pm
Rusty
_________________
...and never Ever think about how good you are at something...
while you're doing it!
My Hot Rock & Blues Playlist

RknRusty- Rest In Peace

- Posts : 10869
Join date : 2011-08-10
Age : 68
Location : South Carolina, USA
Re: 3D Printing
![]() ian1954 Sun Dec 22, 2013 4:03 pm
ian1954 Sun Dec 22, 2013 4:03 pm
RknRusty wrote:Ian, I keep starting to ask questions about your C/G locator, but hesitate and think more about it. Suspension string location, mostly. Very interesting.
Rusty
The way it works is simple but more complicated than it looks. I have a few more planes to balance and I will video it (when I get the time - busy finishing things off so that I can tidy up for Christamas!) because it is very accurate. I find it better than the Great Planes thingy I have as it works with very light models. The Great Planes thingy needs planes of a certain weight.
ian1954- Diamond Member
- Posts : 2688
Join date : 2011-11-16
Age : 69
Location : England
Re: 3D Printing
![]() RknRusty Sun Dec 22, 2013 4:41 pm
RknRusty Sun Dec 22, 2013 4:41 pm
Rusty
_________________
...and never Ever think about how good you are at something...
while you're doing it!
My Hot Rock & Blues Playlist
RknRusty- Rest In Peace
- Posts : 10869
Join date : 2011-08-10
Age : 68
Location : South Carolina, USA
Re: 3D Printing
![]() ian1954 Sun Dec 22, 2013 4:56 pm
ian1954 Sun Dec 22, 2013 4:56 pm
You move the strings along the fuselage until the plane is level and then the plumb bob indicates where the C of G is.
Add weight to correct - re level the plane - and then check where the plumb bob is pointing.
Repeat until the C of G is where you want it to be.
ian1954- Diamond Member
- Posts : 2688
Join date : 2011-11-16
Age : 69
Location : England
Re: 3D Printing
![]() Cribbs74 Sun Dec 22, 2013 5:12 pm
Cribbs74 Sun Dec 22, 2013 5:12 pm
Cribbs74- Moderator
-
Posts : 11895
Join date : 2011-10-24
Age : 50
Location : Tuttle, OK
Re: 3D Printing
![]() pkrankow Sun Dec 22, 2013 5:16 pm
pkrankow Sun Dec 22, 2013 5:16 pm
Cribbs74 wrote:Could one just suspend the model by a single string at the CG point and add or remove weight to make the plane level?
Yes. Using fingers, pencils, or other under the wing support is another option too.
This is just a different way to skin the cat, so to speak.
I suspect this would function without the bearings, or any other added fanciness.
Phil
pkrankow- Top Poster
- Posts : 3025
Join date : 2012-10-02
Location : Ohio
Re: 3D Printing
![]() ian1954 Sun Dec 22, 2013 5:32 pm
ian1954 Sun Dec 22, 2013 5:32 pm
Cribbs74 wrote:Could one just suspend the model by a single string at the CG point and add or remove weight to make the plane level?
Yes you could but how would you attach the string. A solid upper wing or a profile fuselage - easy, a hook secrewed in at the C of G point. but ....... if the screw comes out!
On a built up plane - things get more difficult - for example, if the canopy is on the C of G.
I balanced the NightHawk by supergluing a bent pin in the upper wing - left it there. Then realised that i needed to change the C of G.
I suppose all methods are good but have limitations.
ian1954- Diamond Member
- Posts : 2688
Join date : 2011-11-16
Age : 69
Location : England
Page 2 of 4 • 1, 2, 3, 4 ![]()
» Printing out .pdf plans to scale
» Printing on Tissue
» Printing in tile program
» Todays Cox 3D Printing Adventures....