Log in
Search
Latest topics
» Jim Walker Firebaby by rdw777 Today at 10:32 am
» **VOTE-ON-THE-NEXT-COX-ENGINE-OF-THE-MONTH** (May 2024)
by Greenman38633 Today at 10:15 am
» Help Pee Wee tank cap .020
by rdw777 Today at 9:24 am
» Here we go again... another Lawn-Boy
by rdw777 Today at 9:17 am
» Revivng Some Childhood Classics
by getback Today at 8:21 am
» Roddie-Rigger.. a 2005 original design
by getback Today at 6:31 am
» A prototype Cox Reed-valve marine engine
by roddie Yesterday at 10:50 pm
» My Cox .049 Marine inboard engine
by F4D Phantom II Yesterday at 9:33 pm
» Jim Walkers FireBee - This is going to be fun
by rsv1cox Yesterday at 7:29 am
» Post your Older books
by rsv1cox Mon May 06, 2024 7:51 pm
» EXTREMELY RARE COX THIMBLE DROME PROTOTYPE "BLACK WIDOW" GAS MODEL AIRPLANE
by rsv1cox Mon May 06, 2024 6:58 pm
» I brake for Turtles....
by rsv1cox Mon May 06, 2024 6:38 pm
Cox Engine of The Month
Timing lesson for Yabby / another of C.T. engine competed
Page 1 of 1
 Timing lesson for Yabby / another of C.T. engine competed
Finished up today another one of C.T. 's engines ---- The Kustom Kraftsmanship engine.
This one was a lot of work as the piston was "really" stuck!
Before and After:

There was so much rust and corrosion that it took a while to find different ways to ge the engine appart.
The prop driver was stripped out and just slipped onto the crankshaft.
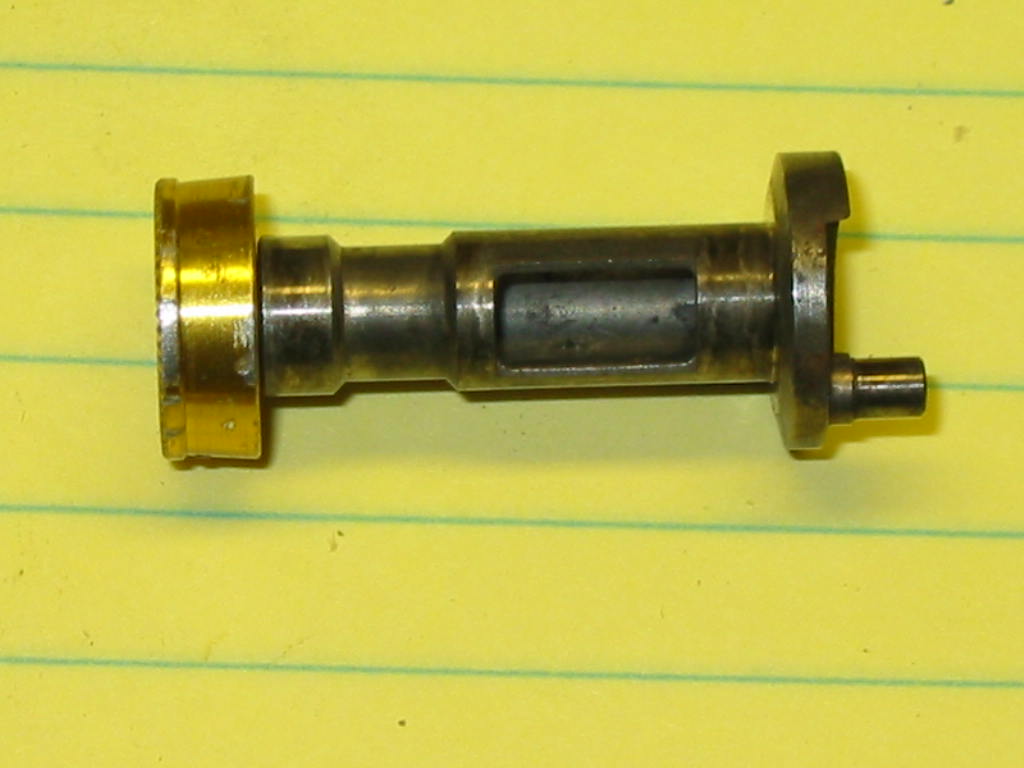
The venturi screen was full of "junk" to where it looked like it was corroded over with something?
So, I installed a new screen after I buffed out the inner cone of the venturi.


With the prop driver removed, the needle valve assembly also removed, and I was able to remove the venturi body and the nut holding the body on (the red plastic part) and that is far as I got as the rest of the engine was not cooperating.
So, I threw the assemble into my sonic tank for cleaning for 20 minutes to see what could shake loose?
Well, the cylinder loosened up, the crankshaft could turn but the backplate and piston/cylinder assemble was stuck.
I then tried my hot plate and antifreeze and let the parts simmer over night.
I was able to get the backplate unscrewed but it was iffy as I unscrewed it the backplate was making a terrible squeaking sound.
I'd unscrew it a little until it felt it was tightening up, spray some Liquid Wrench (lubricant), screw the backplate back in then back it out again until it tightens up again, then repeated the spraying of the Liquid Wrench until I finally got the backplate off.
What the problem with the backplate is the anodizing. With the aluminum and the anodizing (dissimilar metal), it oxidized and filled up the threads (like using Loctite on them).
With the backplate off and the crankshaft free to turn, I was able to unscrew the cylinder (piston still stuck in the sleeve) and with the crankshaft turning, I was able to disconnect the connecting rod from the crankshaft.
And, I took a photo of the piston/cylinder underneath side and also how bad the corrosion is on the engine housing.
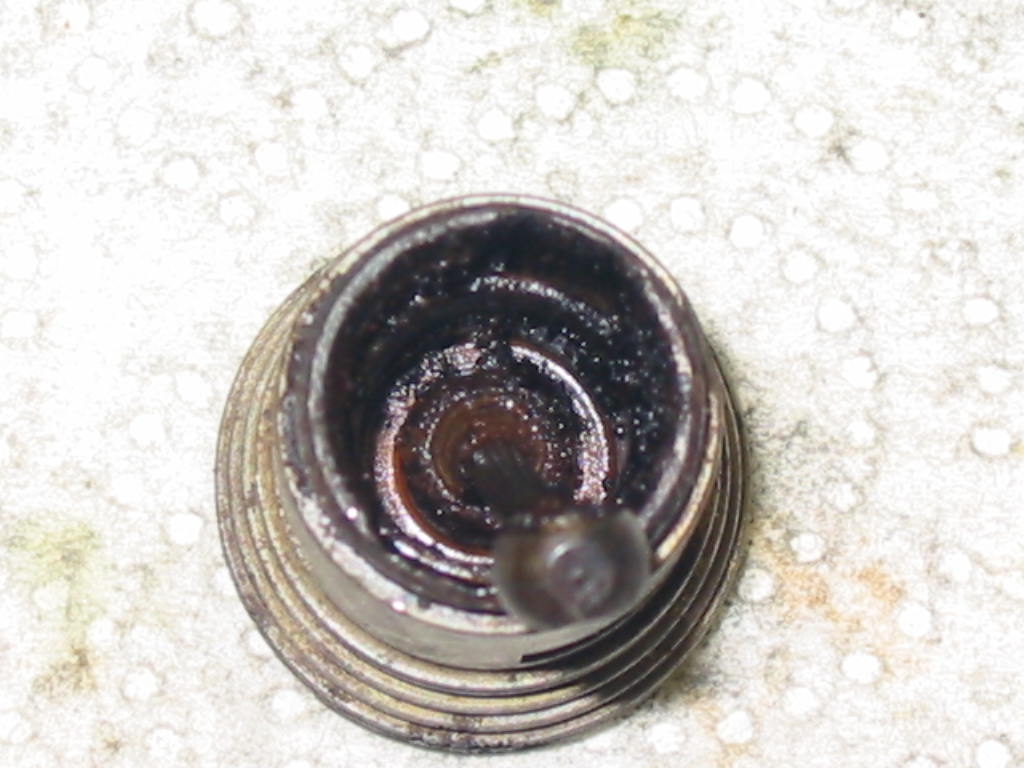


Here is what the piston looks like now after one day in a solution weak solution for a day in C/L/R (calcium/lime/ rust remover)

As I have marked on the photo where the rust was and what caused it to have the rust there is where the exhaust port was, and the piston exposed to corrosion.
Onto the rebuild of C.T.'s Kustom Kraftsmanship engine (for you Yabby and C.T.)
After I cleaned the entire engine in my sonic tank (excluding the "plastic" parts -- the red venturi body)
Buffed up the parts a little and re-blued the cylinder.
Now for the rebuild.
1st was to replace the old needle valve seal on the KK needle valve body as it was cracked.


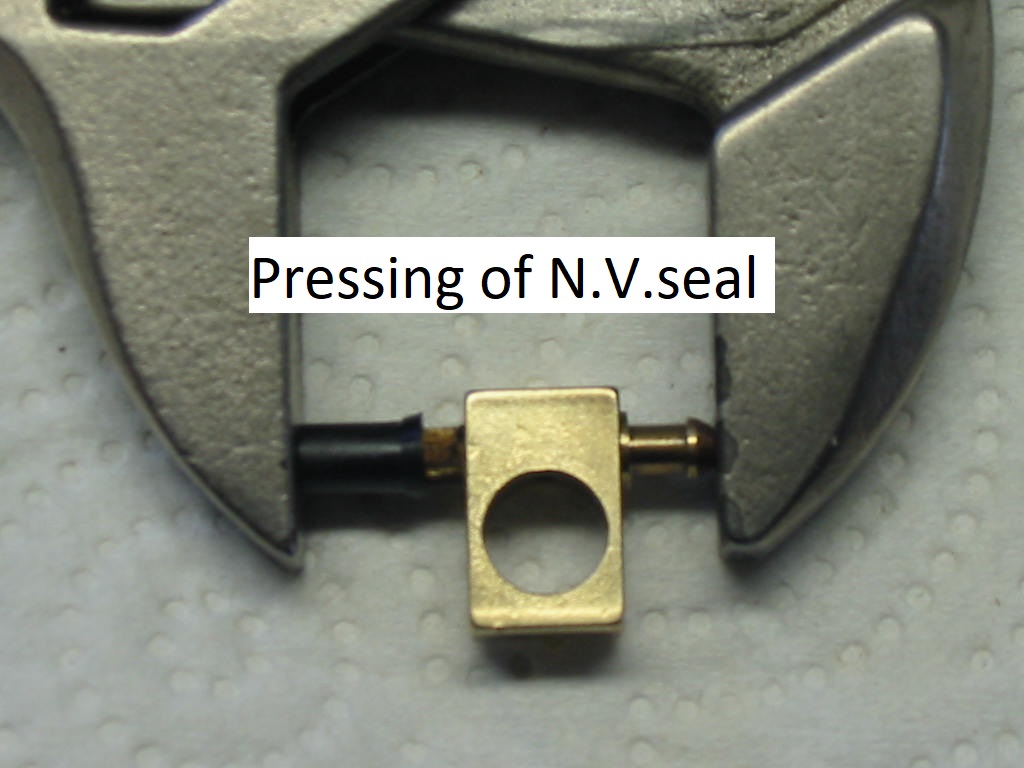

Simple enough job and with the special channel locks (with no serrations) to damage the new seal.
And I had plenty left over so I have shipped the extras to C.T. when they need replacing.

I assembled the venturi body (red) onto the crankcase, and then threaded on the screw that holds the venturi body and tightened up to finger tight, then used the wrench and gave it an 1/8 of a turn (you don't need to really tighten this up as the aluminum will expand (the plastic won't -- tightened too much and it will crack later on!)
Next was to press on the new prop driver onto the crankshaft (don't forget the thrust washer!).
I use my little hand press to do this.
On the base is a pin that slips into the intake hole on the crankshaft (tight slip fit -- for different engines) and on the ramming end is a flat plate that presses the prop drivers on.
Lightly press it all together until the prop driver and thrust washer stops at the shoulder on the crankshaft.
Next is to use my Turbine oil to oil up the piston (even the underside where the socket ball is at) and assemble it to the crankshaft.
now oil the treads on the crankcase and backplate and screw them together.
For Yabby:
Here is how I check the deck height for the piston timing.
I oil the cylinder and screw it onto the crankcase (piston sliding into the cylinder sleeve)
I install my glow plug shoulder plug at the top.

Install my "glow" head adapter (or you can use an old burnt-out glow head with the glow area drilled out?)
This is only hand tightened like the cylinder sleeve.

Now I rotate the crankshaft until the piston is at TDC.
Now, "IF" your piston hits and stops at TDC, then you know that shims are needed between the crankcase and the cylinder sleeve.
I put the "black" marks on the engine for help here (for a guide)
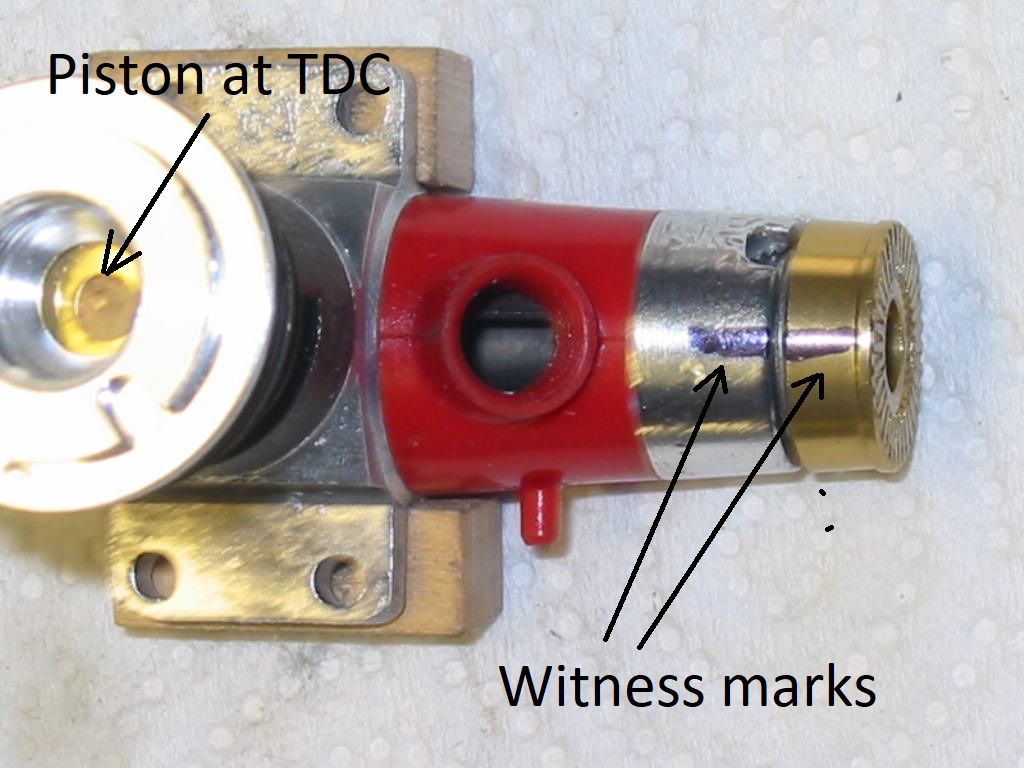

Now, if you can't turn the crankshaft past TDC, then slowly unscrew the cylinder until you can.
What I do then is using a feeler gages I try to slip a shim between the crankcase and the cylinder sleeve.
This will get you the approximate size shim needed to shim the cylinder up.

I purchased from Cox International the "FOUR" shims that burnie sells when I ordered the additional engine parts.
If you can't make your own, these will be acceptable for shimming.
Of the four in the set, I used three of them on the three engines I rebuilt.
One I used was the correct thickness at .010" (0.254mm) (for this Kustom Kraftsmanship engine. (in the photo with the caliper)
Another one I had to sand down to .008" (0.203mm) for the Tee Dee .049.
So that left me with "two" .015" (0.38mm) for the Tee Dee .051 R/C and I had to sand that down to .009" and reduce the outside diameter as well to be the same size as the cylinder sleeve diameter (you will see why later)
So, "if" you need some shims, they will work.
Interesting fact on this engine when I took it apart. It had "three" glow head shims on top.


When checking the deck height with these shims, the piston would swing past without touching the piston (Hello Yabby?)
Knowing this, this engine was not hand built by Kustom Kraftsmanship ---- just the backplate was added by the previous owner, probably for fuel tank pressure?
Back to the timing:
When the cylinder is unscrewed to where the piston can go by TDC, you should feel a very slight "BUMP" -- a bump to where there is none at all (this will be explained later).
Now with the gap measured (and if you purchased the "4" shims from Burnie - Cox International / Matt - EX Model Engines)
What size will be close to the feeler gage?
If the sizes in the 4 are too thick, you can sand the thickness down using 400 grit sandpaper (also nice to have a pair of calipers handy too to see how much you sanded off?)
In my case with the "three" glow head shims, I used my calipers (get a pair from Harbor Freight) and measured the three together and got my shim thickness.
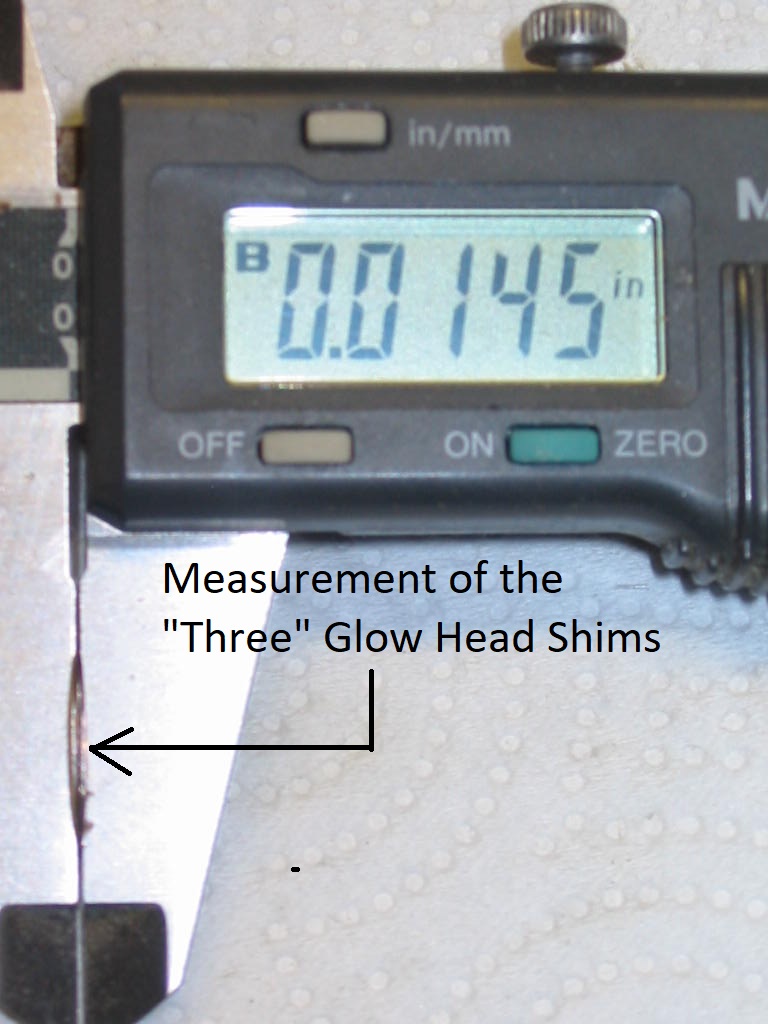
So out of the four from the shims I purchased from Burnie, the .01" could work for me.
One thing to remember on measuring the three shims is that it is not one piece of metal and there will be a measuring error (bigger) because of that.

And I installed the shim between the crankcase and cylinder:
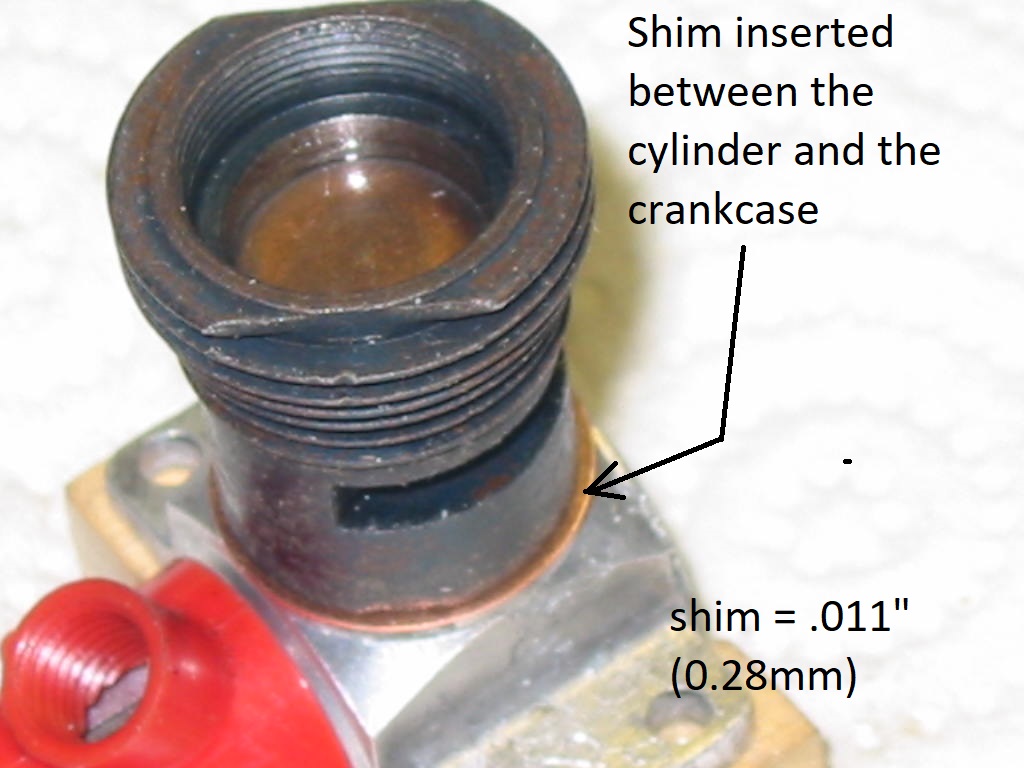
Last thing to do now is to tighten the cylinder to the crankcase to check an see if the shim is the correct thickness.
This is where when you had everything finger tight comes in.
I told you that when the piston comes to TDC and you should feel a very slight "BUMP", when you tighten down on the cylinder, that very hardly noticeable "BUMP" will be more noticeable after things are tightened down.
See the photos below:
Piston Before TDC --- with shim installed

Piston At TDC --- with shim installed

Piston After TDC --- with shim installed
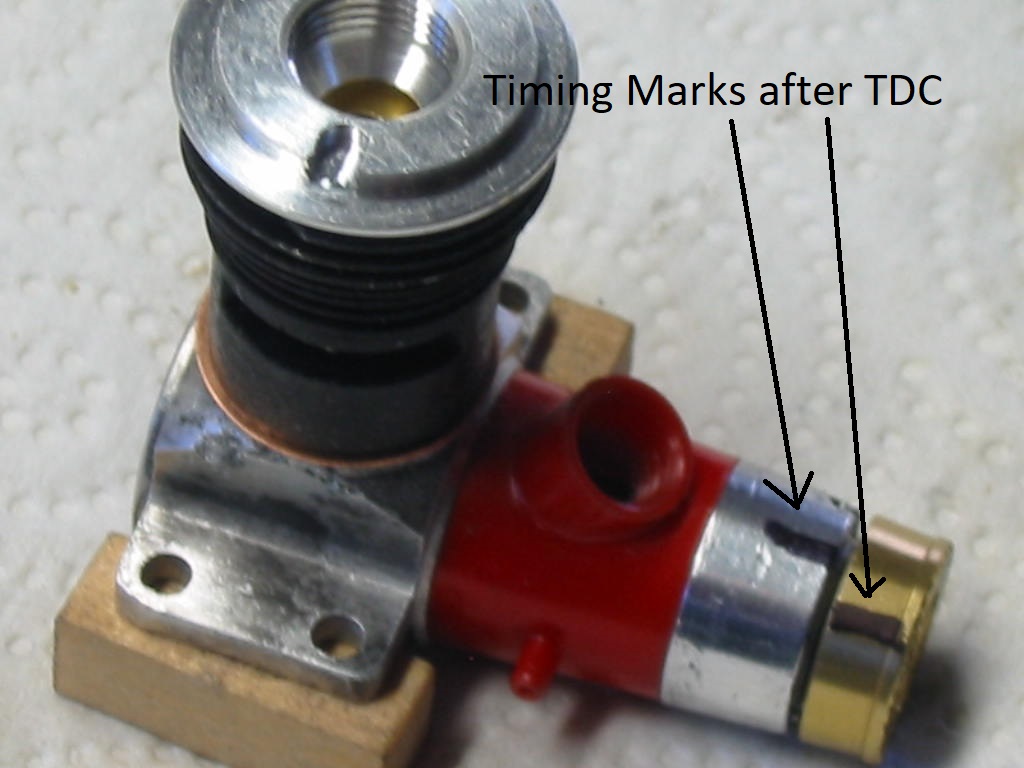
If you have a hard "BUMP" after the TDC, then you shim needs to be just slightly thicker.
The bump you feel as you turn the crankshaft is the "crown" of the piston hitting the slug (stop).
The deck height (shoulder) where the glow plug stops, and the side of the piston is a few thousands (microns) below that.
If you take a ruler across the top of the piston you will see that the center is slightly higher, that is why yoy want to feel a very slight "BUMP" hitting the slug/stop.
Now you will have an engine that will give you the correct compression/SPI and you can then also decrease the compression by adding shims under the glow head.
To finish up ---- here are photos of an engine that can be called a Kustom Kraftsmanship engine.
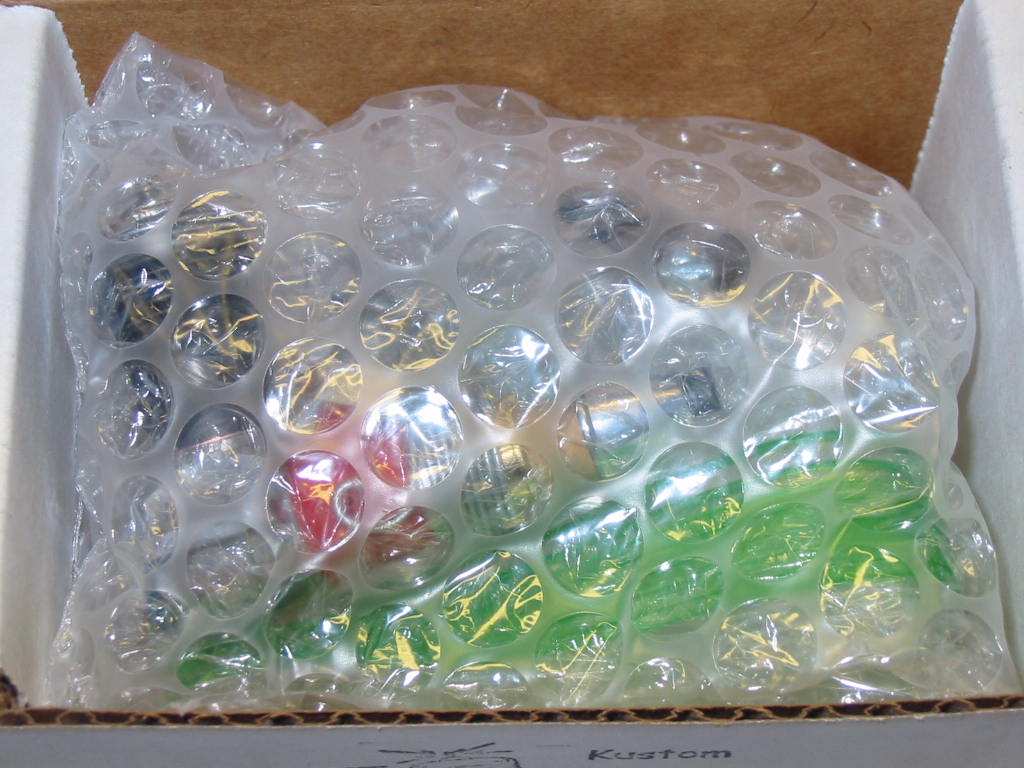
C.T. ----- I'm giving you one of the boxes from my collection from engines I use to purchase from Kustom Kraftsmanship.
The three glow head shims are in the box as well. To be used on other engines -- if needed?
KK engines were more expensive, but they were the best! (hand built)


This one was a lot of work as the piston was "really" stuck!
Before and After:

There was so much rust and corrosion that it took a while to find different ways to ge the engine appart.
The prop driver was stripped out and just slipped onto the crankshaft.

The venturi screen was full of "junk" to where it looked like it was corroded over with something?
So, I installed a new screen after I buffed out the inner cone of the venturi.


With the prop driver removed, the needle valve assembly also removed, and I was able to remove the venturi body and the nut holding the body on (the red plastic part) and that is far as I got as the rest of the engine was not cooperating.
So, I threw the assemble into my sonic tank for cleaning for 20 minutes to see what could shake loose?
Well, the cylinder loosened up, the crankshaft could turn but the backplate and piston/cylinder assemble was stuck.
I then tried my hot plate and antifreeze and let the parts simmer over night.
I was able to get the backplate unscrewed but it was iffy as I unscrewed it the backplate was making a terrible squeaking sound.
I'd unscrew it a little until it felt it was tightening up, spray some Liquid Wrench (lubricant), screw the backplate back in then back it out again until it tightens up again, then repeated the spraying of the Liquid Wrench until I finally got the backplate off.
What the problem with the backplate is the anodizing. With the aluminum and the anodizing (dissimilar metal), it oxidized and filled up the threads (like using Loctite on them).
With the backplate off and the crankshaft free to turn, I was able to unscrew the cylinder (piston still stuck in the sleeve) and with the crankshaft turning, I was able to disconnect the connecting rod from the crankshaft.
And, I took a photo of the piston/cylinder underneath side and also how bad the corrosion is on the engine housing.


Here is what the piston looks like now after one day in a solution weak solution for a day in C/L/R (calcium/lime/ rust remover)

As I have marked on the photo where the rust was and what caused it to have the rust there is where the exhaust port was, and the piston exposed to corrosion.
Onto the rebuild of C.T.'s Kustom Kraftsmanship engine (for you Yabby and C.T.)
After I cleaned the entire engine in my sonic tank (excluding the "plastic" parts -- the red venturi body)
Buffed up the parts a little and re-blued the cylinder.
Now for the rebuild.
1st was to replace the old needle valve seal on the KK needle valve body as it was cracked.


Simple enough job and with the special channel locks (with no serrations) to damage the new seal.
And I had plenty left over so I have shipped the extras to C.T. when they need replacing.

I assembled the venturi body (red) onto the crankcase, and then threaded on the screw that holds the venturi body and tightened up to finger tight, then used the wrench and gave it an 1/8 of a turn (you don't need to really tighten this up as the aluminum will expand (the plastic won't -- tightened too much and it will crack later on!)
Next was to press on the new prop driver onto the crankshaft (don't forget the thrust washer!).
I use my little hand press to do this.
On the base is a pin that slips into the intake hole on the crankshaft (tight slip fit -- for different engines) and on the ramming end is a flat plate that presses the prop drivers on.
Lightly press it all together until the prop driver and thrust washer stops at the shoulder on the crankshaft.
Next is to use my Turbine oil to oil up the piston (even the underside where the socket ball is at) and assemble it to the crankshaft.
now oil the treads on the crankcase and backplate and screw them together.
For Yabby:
Here is how I check the deck height for the piston timing.
I oil the cylinder and screw it onto the crankcase (piston sliding into the cylinder sleeve)
I install my glow plug shoulder plug at the top.

Install my "glow" head adapter (or you can use an old burnt-out glow head with the glow area drilled out?)
This is only hand tightened like the cylinder sleeve.

Now I rotate the crankshaft until the piston is at TDC.
Now, "IF" your piston hits and stops at TDC, then you know that shims are needed between the crankcase and the cylinder sleeve.
I put the "black" marks on the engine for help here (for a guide)


Now, if you can't turn the crankshaft past TDC, then slowly unscrew the cylinder until you can.
What I do then is using a feeler gages I try to slip a shim between the crankcase and the cylinder sleeve.
This will get you the approximate size shim needed to shim the cylinder up.

I purchased from Cox International the "FOUR" shims that burnie sells when I ordered the additional engine parts.
If you can't make your own, these will be acceptable for shimming.
Of the four in the set, I used three of them on the three engines I rebuilt.
One I used was the correct thickness at .010" (0.254mm) (for this Kustom Kraftsmanship engine. (in the photo with the caliper)
Another one I had to sand down to .008" (0.203mm) for the Tee Dee .049.
So that left me with "two" .015" (0.38mm) for the Tee Dee .051 R/C and I had to sand that down to .009" and reduce the outside diameter as well to be the same size as the cylinder sleeve diameter (you will see why later)
So, "if" you need some shims, they will work.
Interesting fact on this engine when I took it apart. It had "three" glow head shims on top.


When checking the deck height with these shims, the piston would swing past without touching the piston (Hello Yabby?)
Knowing this, this engine was not hand built by Kustom Kraftsmanship ---- just the backplate was added by the previous owner, probably for fuel tank pressure?
Back to the timing:
When the cylinder is unscrewed to where the piston can go by TDC, you should feel a very slight "BUMP" -- a bump to where there is none at all (this will be explained later).
Now with the gap measured (and if you purchased the "4" shims from Burnie - Cox International / Matt - EX Model Engines)
What size will be close to the feeler gage?
If the sizes in the 4 are too thick, you can sand the thickness down using 400 grit sandpaper (also nice to have a pair of calipers handy too to see how much you sanded off?)
In my case with the "three" glow head shims, I used my calipers (get a pair from Harbor Freight) and measured the three together and got my shim thickness.

So out of the four from the shims I purchased from Burnie, the .01" could work for me.
One thing to remember on measuring the three shims is that it is not one piece of metal and there will be a measuring error (bigger) because of that.

And I installed the shim between the crankcase and cylinder:

Last thing to do now is to tighten the cylinder to the crankcase to check an see if the shim is the correct thickness.
This is where when you had everything finger tight comes in.
I told you that when the piston comes to TDC and you should feel a very slight "BUMP", when you tighten down on the cylinder, that very hardly noticeable "BUMP" will be more noticeable after things are tightened down.
See the photos below:
Piston Before TDC --- with shim installed

Piston At TDC --- with shim installed

Piston After TDC --- with shim installed

If you have a hard "BUMP" after the TDC, then you shim needs to be just slightly thicker.
The bump you feel as you turn the crankshaft is the "crown" of the piston hitting the slug (stop).
The deck height (shoulder) where the glow plug stops, and the side of the piston is a few thousands (microns) below that.
If you take a ruler across the top of the piston you will see that the center is slightly higher, that is why yoy want to feel a very slight "BUMP" hitting the slug/stop.
Now you will have an engine that will give you the correct compression/SPI and you can then also decrease the compression by adding shims under the glow head.
To finish up ---- here are photos of an engine that can be called a Kustom Kraftsmanship engine.
C.T. ----- I'm giving you one of the boxes from my collection from engines I use to purchase from Kustom Kraftsmanship.
The three glow head shims are in the box as well. To be used on other engines -- if needed?
KK engines were more expensive, but they were the best! (hand built)


sosam117- Diamond Member

- Posts : 1292
Join date : 2016-03-23
Location : Suburb of Chicago, Illinois
 The Amazing Mike is at it, again!
Thanks Mike! I bought that engine at an R/C hobby store in Peoria, IL in '95. It was in a KK labeled box with a pamphlet in it. I don't remember the price. It is the only engine I never mounted or ran. When those engines got wet it destroyed the box and paper. You've done wonders!
CT
CT

Boats13- Silver Member


Posts : 92
Join date : 2018-01-28
Location : Kemah
 Re: Timing lesson for Yabby / another of C.T. engine competed
Hey Mike  excellent tutorial.
  I hope to build up a new 049 TD soon and it will be nice to have one with the SPI, timing, and deck height all correct. Flying half A, is my modelling passion. my models arent very good and Im not a great pilot, but when I fly one with a TD 049 really on song, it makes me really happy.
I have always built my TDs from parts and have always been somewhat frustrated by some engines going great and others not. Im keen to build up a new one as you have described. Once ive built one and tested it I will let you know how it goes. will be a while before I do as I have Covid, but I also have Non Hodgkins Lymphoma underlying it and they dont play well together. lol. but I will get better from the Covid eventually and Im really hopeful of flying one of my begginer baby ringmasters with an 049 TD that really mills on 42 foot lines
thanks for all of the effort put in with the photos and marking them up. Im really good with what and why needs to be done. I even have feeler gauges.

 I hope to build up a new 049 TD soon and it will be nice to have one with the SPI, timing, and deck height all correct. Flying half A, is my modelling passion. my models arent very good and Im not a great pilot, but when I fly one with a TD 049 really on song, it makes me really happy.
I have always built my TDs from parts and have always been somewhat frustrated by some engines going great and others not. Im keen to build up a new one as you have described. Once ive built one and tested it I will let you know how it goes. will be a while before I do as I have Covid, but I also have Non Hodgkins Lymphoma underlying it and they dont play well together. lol. but I will get better from the Covid eventually and Im really hopeful of flying one of my begginer baby ringmasters with an 049 TD that really mills on 42 foot lines

thanks for all of the effort put in with the photos and marking them up. Im really good with what and why needs to be done. I even have feeler gauges.


Yabby- Platinum Member


Posts : 702
Join date : 2021-06-08
Location : Yorke Peninsula South Australia
 Re: Timing lesson for Yabby / another of C.T. engine competed
Thanks for taking the time to post the correct way to ck. and set the timing on these little jewels .  What do you think the deck to piston height ended up at ? As far as i know there is no book or directions on what it should bee ..
 What do you think the deck to piston height ended up at ? As far as i know there is no book or directions on what it should bee ..
getback- Top Poster


Posts : 10141
Join date : 2013-01-18
Age : 66
Location : julian , NC
 Re: Timing lesson for Yabby / another of C.T. engine competed
Boats13 wrote:Thanks Mike! I bought that engine at an R/C hobby store in Peoria, IL in '95. It was in a KK labeled box with a pamphlet in it. I don't remember the price. It is the only engine I never mounted or ran. When those engines got wet it destroyed the box and paper. You've done wonders!
CT
I was offered $25.00 for the box as it was in good shape.
Sadly, that I never really kept the papers that came with the KK engines.
Early 20's and I knew better and could do it better with no instructions.

sosam117- Diamond Member

- Posts : 1292
Join date : 2016-03-23
Location : Suburb of Chicago, Illinois
 Re: Timing lesson for Yabby / another of C.T. engine competed
Yabby wrote:Hey Mikeexcellent tutorial.
I hope to build up a new 049 TD soon and it will be nice to have one with the SPI, timing, and deck height all correct. Flying half A, is my modelling passion. my models arent very good and Im not a great pilot, but when I fly one with a TD 049 really on song, it makes me really happy.

I have always built my TDs from parts and have always been somewhat frustrated by some engines going great and others not. Im keen to build up a new one as you have described. Once ive built one and tested it I will let you know how it goes. will be a while before I do as I have Covid, but I also have Non Hodgkins Lymphoma underlying it and they dont play well together. lol. but I will get better from the Covid eventually and Im really hopeful of flying one of my begginer baby ringmasters with an 049 TD that really mills on 42 foot lines
thanks for all of the effort put in with the photos and marking them up. Im really good with what and why needs to be done. I even have feeler gauges.

Yabby,
A week ago, I received my covid-19 booster shot (that makes #7) and my MMR (Mumps, Measles, Rubella) booster shot.
Had to pay $134.16 for the MMR shot as Health plan wouldn't pay for it.
I never had the Mumps or Measles as my parents had us get the shots when we were kids.
Back when I was young, the school wouldn't let you go to school unless you showed a card that proved that you got the shots.
These days ---- nothing ---- and right now Chicago is having an epidemic of mumps from the migrants coming into Chicago.
So, I'm all up to date on every booster shot I could get!
Now for the Cox .049.
C.T. sent me one and I just finished up a build on that one ---- plus an added feature for C.T.'s engine.
A Kustom Kraftsmanship Throttle sleeve.
In the build, I explain the difference of the KK throttle valve over the Cox and Ace R/C throttle valve.
C.T. should be happy that he now has another engine with throttle control.

sosam117- Diamond Member

- Posts : 1292
Join date : 2016-03-23
Location : Suburb of Chicago, Illinois

1/2A Nut- Top Poster

- Posts : 3434
Join date : 2013-10-20
Age : 60
Location : Brad in Texas
 Disappointed!
I think I was ripped off by the LHS in Peoria. I remember them saying that it had a chrome hand lapped crankshaft. I don't remember the price on it, but it was way more than the stock TeeDee .09 next to it, in the display case. I wonder if they just bought all the parts and those parts came in that box?! I certainly trust Mike's experience and. judgement over the sales pitch that I fell for... they probably dropped the compression with the three headgaskets to make it easier to start & adjust the the needle. Keep the heat down for the initial runs, too. I really believed that I had a real KK built engine. I feel gullible! Thanks Mike, you've saved these engines, after I thought they were beyond resurrection. My family wanted me to throw them in the recycling  bin. I lost several balsa kits and my old Kraft three channel AM. It had corroded through and bubbled up the cladding, all over.
Radio South had Gold Stickered that thing. It was a gift from my uncle, when I was 11. Oh, and my roll of Japanese tissue! They were all down inside a "tote" from Home Depot. We replaced some Rubbermaid Rougb Totes that had split over time and weight... those new ones were yellow Topped black bottomed pieces of excrement. The lip did not overhang and drop down... it had holes molded in the rim for a padlock. Perfect for letting blowing rain to soak all of them stacked at the end of the carport. I have no idea how many hundreds of books and tools were lost to water and the ensuing black mold and rust/corrosion. Saving saving a couple of hundred bucks cost us thousands.
Mike, I never thought they would run again. We sold the house, bought this boat and having no model engine tools left, nor space for them on the boat, they were destined to purgatory until my kids threw them out, after I was gone. You've made a part of my life a better place. I look forward to hanging them on airplanes and hopefully getting video to post and show off your handiwork.
I know it's a sin to not just jewel box them. But, while I love these things, I want to see them run and fly as designed or even better in the case of the KK .051!
CT
PS: wow, just reread this... man, do I need my ADHD meds!

Boats13- Silver Member


Posts : 92
Join date : 2018-01-28
Location : Kemah
 Re: Timing lesson for Yabby / another of C.T. engine competed
Boats13 wrote:I think I was ripped off by the LHS in Peoria. I remember them saying that it had a chrome hand lapped crankshaft. I don't remember the price on it, but it was way more than the stock TeeDee .09 next to it, in the display case. I wonder if they just bought all the parts and those parts came in that box?! I certainly trust Mike's experience and. judgement over the sales pitch that I fell for... they probably dropped the compression with the three headgaskets to make it easier to start & adjust the the needle. Keep the heat down for the initial runs, too. I really believed that I had a real KK built engine. I feel gullible! Thanks Mike, you've saved these engines, after I thought they were beyond resurrection. My family wanted me to throw them in the recyclingbin. I lost several balsa kits and my old Kraft three channel AM. It had corroded through and bubbled up the cladding, all over.
Radio South had Gold Stickered that thing. It was a gift from my uncle, when I was 11. Oh, and my roll of Japanese tissue! They were all down inside a "tote" from Home Depot. We replaced some Rubbermaid Rougb Totes that had split over time and weight... those new ones were yellow Topped black bottomed pieces of excrement. The lip did not overhang and drop down... it had holes molded in the rim for a padlock. Perfect for letting blowing rain to soak all of them stacked at the end of the carport. I have no idea how many hundreds of books and tools were lost to water and the ensuing black mold and rust/corrosion. Saving saving a couple of hundred bucks cost us thousands.
Mike, I never thought they would run again. We sold the house, bought this boat and having no model engine tools left, nor space for them on the boat, they were destined to purgatory until my kids threw them out, after I was gone. You've made a part of my life a better place. I look forward to hanging them on airplanes and hopefully getting video to post and show off your handiwork.
I know it's a sin to not just jewel box them. But, while I love these things, I want to see them run and fly as designed or even better in the case of the KK .051!
CT
PS: wow, just reread this... man, do I need my ADHD meds!
Yes, C.T.
The backplate on yours is not the one with the ball check.
What you have on your KK engine is a backplate with a very small hole to pressurize the tank which is the "cheaper" back presure plate that is really not as effective as the "ball" check backplate.
I checked yours with a .006" wire and the wire went straight through.
If it was the "ball" check version, the wire would have hit the ball and stopped.
By the way, I have a set if very small wires as I was an inspector for Caterpillar Fuel Systems, and we had to use very small wires to check the spray pattern on the fuel injectors fir the injector tips.
You really learn how to use a microscope to put that little wire in that little hole.
And that hole had two different sizes that we had to check twice a shift.
The main through hole and the external near the od which was slightly larger.
Reason for that was over time the main hole would open up wider because of the fuel constantly shooting through that hole.
Like a river of water --- after a time it erodes the material away and makes the hole bigger.
Learned much about fuel systems (injectors, pressurizing fuel pumps, common rail injectors, capsule valve injectors.)
And I have 2 patents (that Cat owns because I did them on company time) of special parts for an injector.
Funny thing --- the one part (that got a patent) I got the idea from was from a bicycle spoke nut. (look it up).
I modified it slightly to hold the solenoid actuator to activate the injection cycle.
And of course, I get/got nothing extra be a pat on the back. But on the wall in the office was a placard of the patent number and Caterpillar's name for the idea.

sosam117- Diamond Member

- Posts : 1292
Join date : 2016-03-23
Location : Suburb of Chicago, Illinois
 Similar topics
» Yabby makes fuel
» Lesson learned
» A history lesson, please
» 1/2A History Lesson
» It's all in the timing.
» Lesson learned
» A history lesson, please
» 1/2A History Lesson
» It's all in the timing.
Page 1 of 1
Permissions in this forum:
You cannot reply to topics in this forum

 Rules
Rules